



How to Fix Shingle Roof Damage in Less Than an Hour a Day
Pinpointing the Source: Common Causes and Safe Leak Detection
To complete an effective shingle roof repair in under an hour, break the adhesive seal under the damaged tab using a flat pry bar, extract the nails securing both the damaged piece and the overlapping course above, slide the broken shingle out, insert a matching replacement, fasten it flush with galvanized roofing nails, and hand-seal the tabs with asphalt roof cement.
Water is remarkably sneaky. When moisture penetrates your exterior roofing barrier, gravity pulls it downward along the roof deck, down rafters, and across ceiling joists before it ever pools enough to create an interior ceiling stain. This means the water spot above your dining table might originate from a penetration ten feet upslope.
Understanding the mechanics of roof assemblies helps demystify where leaks originate. Shingle roofs are steep-slope gravity systems designed to shed water downward over successive overlapping courses. While missing or torn shingles certainly allow water in, they are rarely the sole culprits. More often, water intrusion stems from compromised penetration points and transitions:
Failed Flashing: Metal flashing details around chimneys, dormers, and side walls carry the highest leak risk per square foot on any roof. If step flashing rusts or counter-flashing pulls away from mortar joints, water slips behind the shingles.
Deteriorated Pipe Boots: Neoprene and rubber plumbing vent boots degrade and split from constant UV exposure long before the surrounding asphalt field shingles reach the end of their design life.
Compromised Valleys: Roof valleys channel massive volumes of water runoff during rainstorms. If valley underlayment is punctured, or if fasteners were driven too close to the valley centerline, water will find those penetrations.
Exposed Fasteners and "Shiners": Fasteners placed improperly, driven crooked, or backed out through the surface create direct channels for water to follow the nail shank straight into the wooden roof deck.
Broken Sealant Strips: High winds can break the thermal adhesive bond between shingle layers. Even if the tab does not blow off completely, wind-driven rain can push moisture underneath unsealed edges.
Before touching a single tool, you can reference resources like How to Replace Damaged Shingles | Step-by-Step DIY Guide | Roofs Wiki to better understand how water travels through layered roofing systems.
Identifying Shingle Roof Repair Warning Signs Early
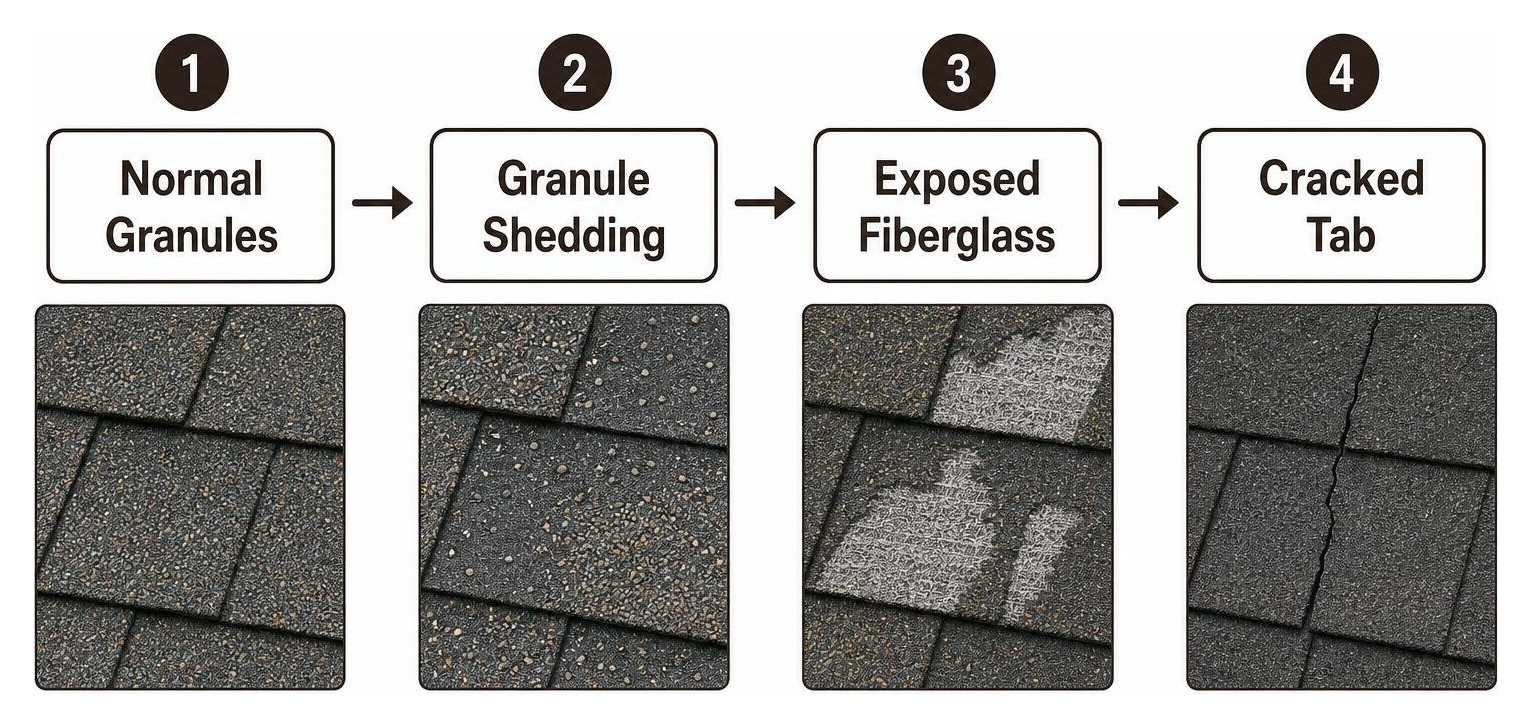
Catching roof wear in its earliest stages prevents minor maintenance from turning into structural rot. Asphalt shingles naturally degrade over time, but specific physical indicators show when targeted maintenance is required:
Granule Loss: Finding a sandy accumulation in your gutters is normal on a brand-new roof, but on an older roof, widespread granule loss exposes the underlying black asphalt coating to rapid UV breakdown.
Exposed Fiberglass: If you notice small white or gray patches on your shingles, the asphalt coating has eroded completely, revealing the structural fiberglass matting underneath.
Curling and Cupping: Shingle edges that curl upward or cup in the center have lost their volatile oils due to age, heat, and poor attic ventilation, making them brittle and prone to wind tear-off.
Cracked or Split Tabs: Thermal expansion and contraction cycles eventually cause aging asphalt to fracture vertically or horizontally across tabs.
Blistering: Trapped moisture within the shingle layer or excessive heat buildup from an unventilated attic space can cause surface blisters that pop, leaving pockmarks.
Safe Attic and Ground Inspection Methods
You do not need to walk across high peaks to perform a thorough preliminary inspection. In fact, climbing on an older roof unnecessarily can crack brittle shingles and do more harm than good.
Start your diagnostic process from the ground using a high-powered pair of binoculars. Walk the entire perimeter of your home on a clear, sunny day. Check the roof planes for missing shingle tabs, lifted edges, sagging rooflines, and rusted flashing along wall transitions.
Next, move inside and head up into your attic space with a strong flashlight. During or immediately after a rainstorm is the ideal time to check:
Look for dark water stains, black mold spots, or active water trails along the wooden rafters and sheathing.
Check around plumbing vent penetrations and chimney framing for damp insulation.
Trace any dampness up to its highest point on the underside of the roof deck; that highest point marks the approximate entry zone on your exterior roof.
If you are using an extension ladder to view the gutters or roof edge up close, always adhere to the standard 4:1 ladder safety ratio: for every four feet of ladder height, set the base one foot out from the wall. Ensure the ladder extends at least three feet above the roof edge and is tied off securely on solid, level ground.
If your visual inspection reveals widespread dampness, structural sagging, or hard-to-reach leaks, scheduling a free roof inspection FB allows experienced professionals to safely diagnose the entire roofing envelope without personal fall risk.
Essential Tools and Materials for Asphalt Shingle Roof Repair
Tackling a localized shingle swap requires specialized tools designed to work between delicate, overlapping roofing layers without tearing sound shingles.
Required Roofing Equipment Checklist
Having everything assembled before you start ensures your repair stays well under the one-hour mark:
Flat Pry Bar (Roofing Bar): A thin, wide pry bar designed to slide gently under shingle tabs to break adhesive seals and lever out sunken roofing nails without gouging shingles.
Claw Hammer: Used for prying stubborn nails and securing replacement fasteners flush into the roof deck.
Utility Knife with Hook Blades: Straight utility blades dull instantly against mineral granules; hook blades slice through thick asphalt shingles cleanly from the back side without slicing the underlying underlayment.
1-1/4 Inch Galvanized Roofing Nails: Large-head, corrosion-resistant nails that anchor the new shingle securely into standard 1/2-inch or 5/8-inch roof sheathing.
Asphalt Plastic Roof Cement: High-grade black asphalt sealant designed for roofing repairs to hand-seal tabs and cover exposed fastener heads.
Dripless Caulking Gun & Putty Knife: For precise application and smoothing of roofing cement beneath loose tabs.
Safety Gear: Soft-soled, non-slip work shoes to maintain traction, safety glasses, and durable work gloves to protect your hands from abrasive ceramic granules.
Color Matching and Material Sourcing
Achieving a clean aesthetic blend is one of the trickiest parts of minor shingle repair. Even if you purchase the exact same brand and color blend originally installed on your home, existing shingles will have weathered from years of UV exposure, rain, and temperature swings.
For tips on sourcing materials and matching aging surfaces, the guide How To Repair and Replace Roof Shingles for Your Home - This Old House offers helpful insights into managing aesthetic blends.
Always use physical samples rather than digital photos when sourcing replacement shingles. Store lighting and phone camera sensors distort shingle undertones. If you have spare bundles stored in your garage or shed from your original roof build, use those first.
If sourcing new stock, identify whether your roof uses traditional flat 3-tab shingles (typically installed with a 5-inch exposure) or thicker, laminated architectural shingles (often installed with a 5-5/8-inch exposure). While slight color variations will be noticeable initially, new shingles naturally oxidize and blend in after several months of weather exposure.
Step-by-Step Guide to Replacing a Damaged Shingle in 60 Minutes
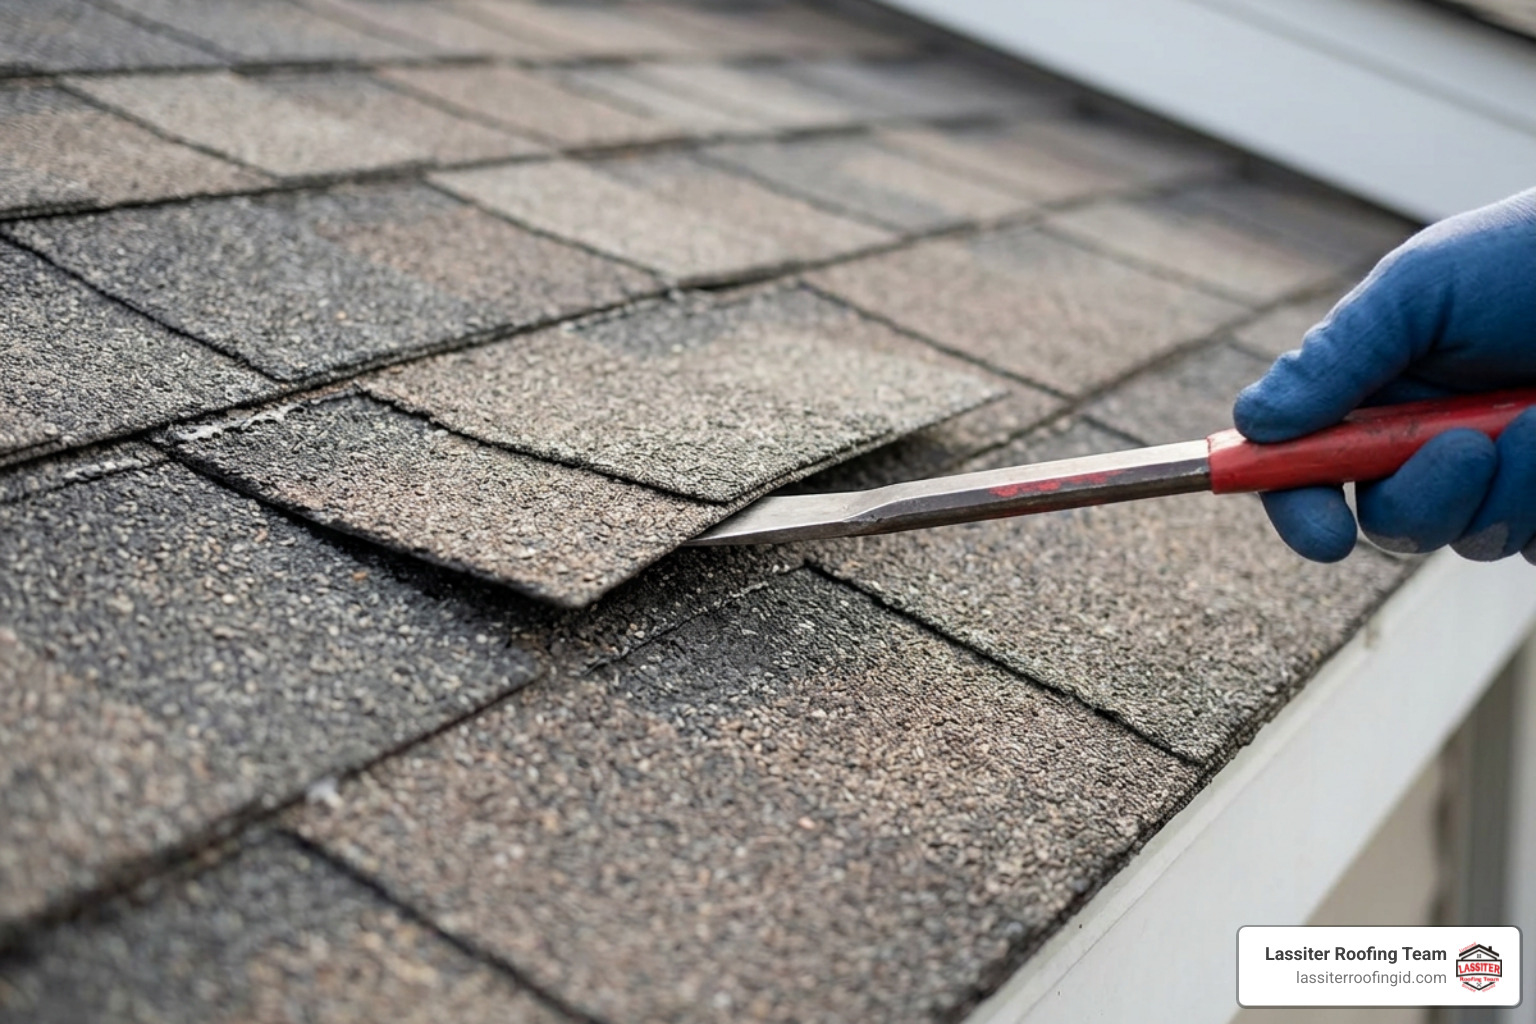
Completing a clean shingle swap requires understanding the mechanical layout of steep-slope roofing. Asphalt shingles are held down by two distinct systems: an adhesive asphalt sealant strip activated by solar heat, and two overlapping rows of galvanized nails.
Only attempt this repair in mild weather—ideally between 60°F and 80°F. If the weather is too cold, asphalt shingles turn rigid and snap when lifted. If it is scorching hot, the shingles become soft and vulnerable to scuffing and tearing underfoot.
Step-by-Step Shingle Roof Repair and Fastener Removal
Break the Adhesive Seal: Slide the flat end of your roofing pry bar horizontally under the damaged shingle tab. Gently push forward to separate the factory sealant bond holding it to the shingle below. Repeat this step for the overlapping shingle directly above the damaged piece, as well as the adjacent shingles to the left and right.
Expose the Fasteners: Each asphalt shingle is held down not only by its own row of nails, but also by the nails driven through the overlapping course directly above it. Lift the tab of the shingle directly above the damaged piece to expose the primary nail line.
Extract the Nails: Slide your pry bar flat underneath the damaged shingle, centering the bar's notch against the nail shank. Pry upward to lift the nail head slightly. Slide the bar out, slip it directly under the nail head, and pull the nail completely out. Repeat this for all four nails holding the target shingle.
Remove Upper Course Fasteners: Lift the tab of the second course above the damaged shingle and extract the four nails driven through that row, which penetrate the top selvage edge of your target shingle. You will extract eight nails in total to free a single 3-tab shingle strip.
Slide the Damaged Shingle Out: Once all eight fasteners are removed, grasp the damaged shingle and slide it downward toward the eave.
Inspect the Decking and Underlayment: Examine the exposed roofing felt or synthetic underlayment. Check for tears, moisture stains, or soft, rotted decking sheathing. If there is a small tear in the felt, apply a small dab of asphalt plastic roof cement over the split before sliding the new shingle into position.

Securing, Nailing, and Resealing the Replacement Tab
Position the Replacement Shingle: Slide your new shingle into the open slot. Align the bottom edge and vertical alignment slots perfectly with the adjacent shingles in the course to ensure proper exposure and water drainage channels.
Fasten the New Shingle: Lift the overlying tabs just high enough to swing your hammer. Drive 1-1/4-inch galvanized roofing nails into the designated nail line—about 1/2 inch to 1 inch above the cutouts for standard 3-tab shingles, or along the reinforced nail zone for architectural shingles.
Use 4 nails per strip for standard 3-tab shingles.
Use 6 nails per strip for architectural shingles or in designated high-wind zones.
Drive every nail straight and flush with the shingle surface. Never overdrive nails (which punches a hole through the asphalt) or leave them raised (which punctures the overlying tab).
Re-fasten the Overlying Course: Drive new galvanized nails into the course directly above to re-secure the top edge of your new shingle, making sure not to reuse loose or stripped nail holes.
Hand-Seal the Tabs: Lift the new shingle tab and apply quarter-sized dabs of asphalt plastic roof cement to the underside of each tab using your caulking gun or putty knife. Apply matching dabs under any surrounding tabs that were loosened during the process. Press down firmly to seat the adhesive bond.
Let It Cure: Allow the roof cement 24 to 48 hours of dry weather to cure completely, ensuring the restored wind uplift rating protects against future storms.
DIY vs. Professional: Costs, Safety Limits, and Replacement Signs
Deciding whether to tackle a shingle repair yourself or call a licensed contractor comes down to three factors: physical safety, the structural scope of the damage, and the overall age of the roof.
Consideration Factor | DIY Shingle Repair | Professional Roofing Repair |
|---|---|---|
Average Cost | $50 to $70 (materials only) | $300 to $600 (labor, materials & warranty) |
Typical Project Time | 30 to 60 minutes per shingle | 1 to 2 hours (complete scope & site cleanup) |
Skill & Safety Level | Low to moderate; simple walk-up roofs only | Advanced fall protection & steep-slope rigging |
Decking Inspection | Limited to surface view under single tab | Full structural evaluation of framing & sheathing |
Warranty Protection | None; homeowner assumes leak liability | 5-year workmanship warranty on labor & materials |
For a comprehensive breakdown of service costs and regional pricing variables, review Asphalt Shingle Roof Repair: Leaks & Costs.
Evaluating Repair Costs and Safety Thresholds
A small DIY repair can be economical if you already own basic tools. A single bundle of composition shingles runs about $30 to $50, a tube of quality roofing cement is approximately $10, and a box of galvanized nails is $10, bringing your out-of-pocket material expense to roughly $50 to $70.
By comparison, professional shingle repair for localized damage generally costs between $300 to $600. That price covers professional equipment, safety harnesses, roof pitch adjustments, travel, proper disposal, and contractor workmanship warranties that protect your home from future water damage.
When to step aside and hire a professional:
Steep Roof Pitches: Slopes exceeding 6:12 or 8:12 become significant slip hazards that require fall arrest harnesses and roof jacks.
Multi-Story Heights: Two-story or three-story homes amplify ladder and fall risks.
The 10% to 15% Damage Rule: If more than 10% to 15% of your total roof surface exhibits missing, cracked, or loose shingles, spot patching is no longer cost-effective.
Active Structural Leaks: If water has softened the roof decking or rotted interior framing, simple top-side patching will not solve the underlying structural decay.
When roof repairs exceed simple DIY safety limits, you can easily request free estimate to get clear pricing for a permanent, professional fix.
Recognizing When Full Roof Replacement Is Necessary
Asphalt shingles are engineered to protect a home for about 20 to 30 years before requiring full replacement. However, initial maintenance issues often show up around the 10 to 15 year mark as seal strips age and pipe boots deteriorate.

Spot repairs make sense on younger, pliable roofs with isolated storm damage. But if your roof exhibits any of the following signs, continuing to patch individual shingles is a poor investment:
Widespread Shingle Brittleness: When lifting an adjacent shingle tab causes it to crack or tear across its width, the asphalt has completely dried out. Attempting to repair one shingle will simply break two more next to it.
Recurring, Staggered Leaks: If leaks keep popping up in different rooms after every wind or rain storm, the entire underlayment layer has likely broken down.
Extensive Decking Rot: Spongy, sagging, or soft roof sheathing means water has saturated the wood over an extended period. Catching small issues early prevents minor leaks from turning into rotted sheathing and mold—damage that can inflate future replacement costs by 20% to 40%.
When a roof reaches the end of its serviceable lifespan, a full shingle roofing installation provides a completely new weather barrier, upgraded ice and water shield membranes, and long-term warranty protection.
Frequently Asked Questions About Roof Maintenance
Can a Single Damaged Shingle Be Repaired Without Replacing the Entire Roof?
Yes. Asphalt shingle systems are inherently modular. Individual shingles can be unsealed, fasteners extracted, and new shingles slid into place without disturbing large sections of the roof. As long as the surrounding shingles retain their flexibility and the wood decking below is sound, replacing isolated damaged shingles fully restores the roof's water-shedding performance and wind resistance.
How Long Does a Standard Shingle Repair Last?
When performed properly with correct nailing depth and manual roof cement sealing, an individual shingle replacement will last as long as the rest of the surrounding roof plane—often 10 to 15 years or more. However, surface patches made strictly with caulk or mastic without swapping out broken materials typically fail within 90 days of seasonal thermal cycling. For more deep dives into roofing lifespans and maintenance practices, browse our collection of blogs.
What Is the Most Common Mistake to Avoid During Shingle Patching?
The single biggest mistake in DIY roofing repairs is overdriving nails, creating "shiners." When a nail is driven too deeply with a hammer or pneumatic gun, the nail head punches through the shingle mat rather than resting flush against the surface. This ruins the holding strength against high winds and creates a direct pathway for water to enter around the torn hole. Always drive nails straight and perfectly flush.
Conclusion
Protecting your home from the top down does not have to be an overwhelming or expensive project. By staying ahead of minor granule loss, unsealed tabs, and isolated storm damage, addressing issues in focused one-hour maintenance windows can keep your roof sound and watertight for decades.
When dealing with high roof pitches, extensive storm damage, or aged materials, working with experienced roofing specialists guarantees your home remains properly shielded through all four seasons. With more than 30 years of industry experience across Idaho's Western Treasure Valley, our team at Lassiter Roofing provides transparent, individually quoted pricing and backs our residential and commercial projects with a dedicated 5-year workmanship warranty. When you need help evaluating your roof's condition, Contact Us to get expert guidance and keep your home protected.


