


The Definitive Guide to Metal Roof Costs and Benefits
Introduction
A successful metal roof installation involves preparing and squaring a sound substructure, installing synthetic and ice-and-water underlayments, securing perimeter drip edge flashings, and fastening standing seam or exposed-fastener panels with expansion clips or gasketed screws before sealing ridges and valleys. When homeowners evaluate long-term building investments, roofing often sits at the top of the priority list. A properly engineered metal roof offers remarkable long-term durability, with service lives comfortably exceeding 40 to 50+ years depending on geography and environmental exposure. One of the most compelling engineering advantages of metal is its low structural weight. While traditional wood, asphalt, or fiberglass shingles weigh between 200 and 350 pounds per square (100 square feet), metal roofing typically weighs just 40 to 120 pounds per square.
This low dead-load minimizes stress on your building's framing while providing superior resistance against high winds, driving rain, and heavy snow loads. Beyond structural resilience, metal systems offer outstanding lifecycle value and energy efficiency. Cool-roof coatings reflect solar radiant heat rather than absorbing it into attic spaces, lowering cooling costs during hot summer months.
Core Anatomy and Components of a Metal Roof System
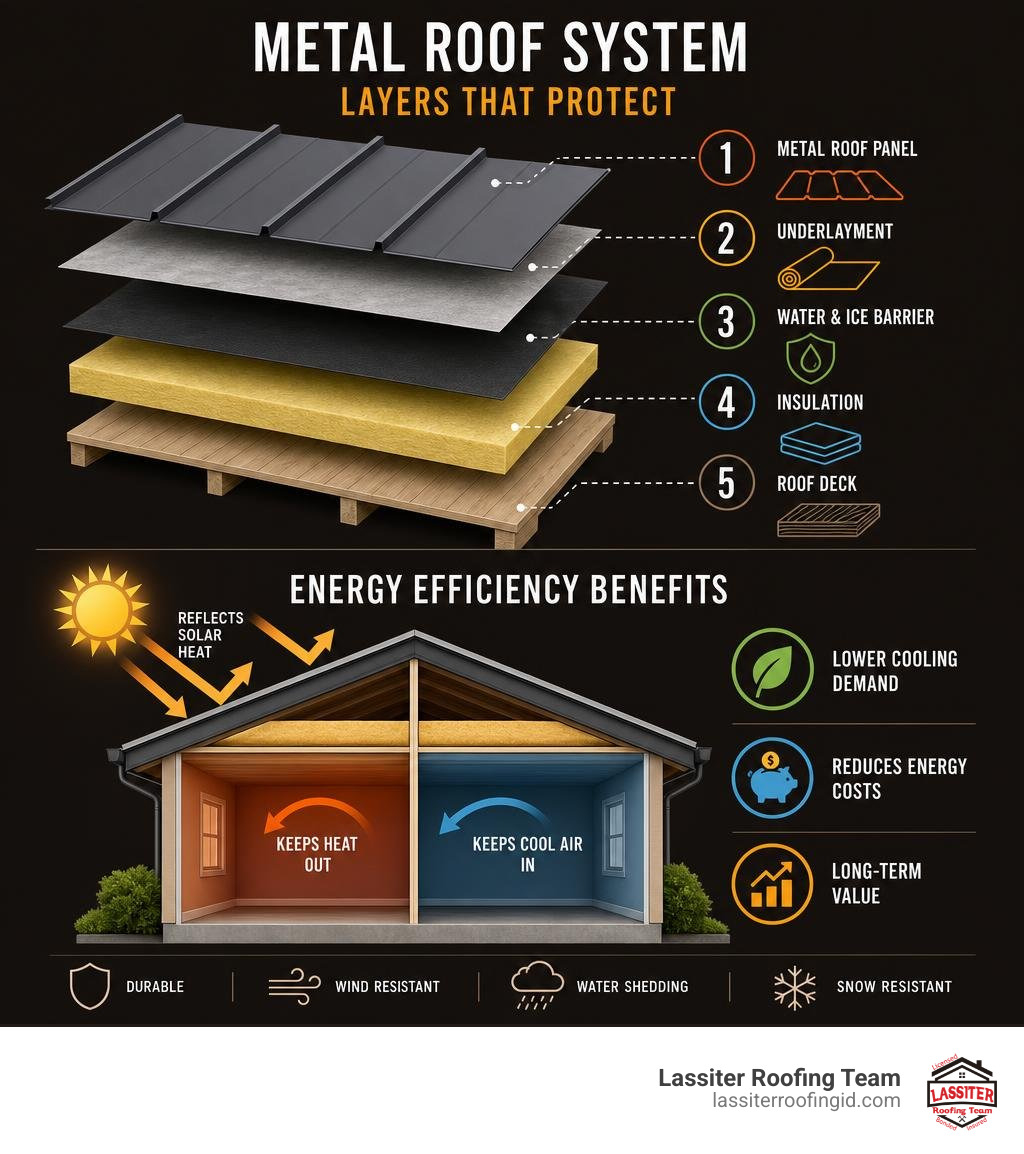
A high-performing metal roof is not simply surface cladding; it is an engineered assembly designed to manage structural loads, moisture migration, and intense thermal dynamics. Every component must function harmoniously to protect the interior envelope.
Five Primary System Components
To understand how a metal roof protects a structure, we break the system down into five fundamental parts as outlined in established industry standards in the Metal Roof Installation Manual:
Substructure: The immediate base beneath the roofing panels, such as solid wood decking or open structural purlins.
Roof Panels: The exterior weather barrier, roll-formed or press-broken into distinct profiles to shed water and resist environmental loads.
Trim and Flashings: Custom-shaped metal components designed to direct water away from vulnerable junctions such as eaves, rakes, valleys, hips, ridges, and sidewalls.
Clips and Fasteners: Engineered mechanical components—either concealed expansion clips or gasketed through-fasteners—that secure the assembly while accommodating thermal movement.
Accessories and Support Structure: Components such as closure strips, pipe boots, snow retention bars, and the primary rafters or trusses transferring structural loads to the foundation.
Substructure Requirements: Solid Decking vs. Open Framing
The choice between a solid deck (such as 5/8-inch plywood or 7/16-inch minimum oriented strand board) and open framing (such as wood or steel purlins) dictates the panel profile you can install. Solid decking provides continuous support across the entire roof plane, creating an ideal base for architectural standing seam profiles and self-adhering underlayments.
Open framing relies on the structural ribs of heavy-gauge corrugated or trapezoidal panels to span open spaces without sagging. The industry standard deflection limit for a roof deck is 1/240th of the total span. For a 4-foot span supporting a 300-pound load, the maximum allowable deflection is 0.20 inches. Additionally, roof pitch governs water runoff; while structural standing seam panels with sealed hydrostatic seams can function on low slopes down to 1/4 inch per foot (1.2°), hydrokinetic (water-shedding) exposed-fastener panels typically require a slope of 3 inches per foot (14° or 3:12 pitch) or greater. For completely flat low-slope areas, dedicated membrane solutions such as TPO flat roof systems are recommended. A properly sloped metal roof should show no evidence of standing water 48 hours after precipitation stops.
Evaluating Metal Roofing Materials, Profiles, and Gauges
Selecting the correct combination of metal substrate, panel profile, and thickness ensures optimal performance in your local climate.
Material / Profile | Common Gauges | Fastener System | Expected Lifespan | Best Application |
|---|---|---|---|---|
Standing Seam (Steel) | 22, 24, 26 ga | Concealed Clips / Nails | 50+ Years | Residential & Commercial Steep-Slope |
Exposed-Fastener Ribbed | 26, 29 ga | Gasketed Screws | 30–45 Years | Agricultural & Residential Outbuildings |
Aluminum Alloy | 0.032"–0.040" | Concealed / Exposed | 50+ Years | Coastal & High-Corrosion Zones |
Natural Zinc / Copper | 24 ga equivalent | Concealed Cleats | 75–100+ Years | Architectural Heritage & Premium Custom |
Standing Seam vs. Exposed-Fastener Panel Profiles
Metal roof profiles fall into two primary categories: concealed-fastener standing seam systems and exposed-fastener through-screwed panels.
Standing Seam (Concealed Fasteners): Profiles such as mechanical lock, snap-lock, and nail flange feature vertical ribs joined above the water plane. Fasteners and expansion clips remain hidden beneath the seams, shielded from sun, rain, and ice. This design allows long panel runs to expand and contract freely during temperature shifts, virtually eliminating thermal fatigue around fastener holes.
Exposed-Fastener Panels: Profiles like corrugated and ribbed sheets are fastened directly through the face of the metal into the decking or purlins using self-drilling screws with neoprene or EPDM washers. While highly cost-effective and structurally rigid, exposed systems require periodic maintenance to check washer degradation. For property owners weighing roof styles, exploring traditional shingle roofing installation alternatives alongside metal profiles helps clarify upfront investments versus lifetime maintenance costs.
Material Selection: Steel Gauges, Aluminum, Zinc, and Protective Coatings
Metal thickness is measured by gauge; a lower gauge number indicates thicker, heavier, and stronger metal:
24-Gauge Steel: Nominal thickness of 0.0239 inches (uncoated) or 0.0276 inches (metallic coated). This is the commercial and premium residential standard, offering maximum resistance to oil canning and denting.
26-Gauge Steel: Nominal thickness of 0.0179 inches (uncoated) or 0.0217 inches (metallic coated). An excellent, durable choice for standard residential roofing.
29-Gauge Metal: Nominal thickness of 0.0142 to 0.0172 inches. Widely utilized for post-frame, agricultural, and economical utility structures.
Carbon steel is protected by sacrificial metallic coatings: Galvanized (zinc-coated) or Galvalume (an alloy of roughly 55% aluminum, 43.4% zinc, and 1.6% silicon), which offers superior atmospheric corrosion protection. Paint finishes add another layer of defense; Siliconized Modified Polyester (SMP) provides dependable chalk and fade resistance, while Polyvinylidene Fluoride (PVDF/Kynar 500) resin coatings offer top-tier ultraviolet protection.
Natural metals like aluminum will not rust, making them ideal in corrosive environments. Copper and zinc develop self-healing patinas that can last over a century. Zinc requires careful temperature management during installation: field fabrication must occur at ambient metal temperatures above 48°F (9°C) to prevent fracturing during bending.
Step-by-Step Guide to Metal Roof Installation
Executing a leak-free installation requires sequential dry-in protocols and disciplined metal-working techniques.
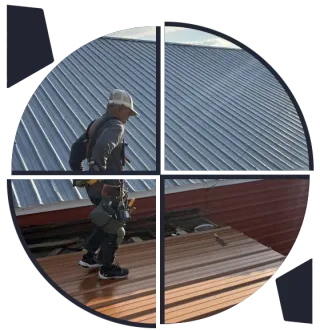
Preparing the Roof Deck Substructure
Before hoisting a single metal sheet, the substrate must be verified for structural soundness and geometry.
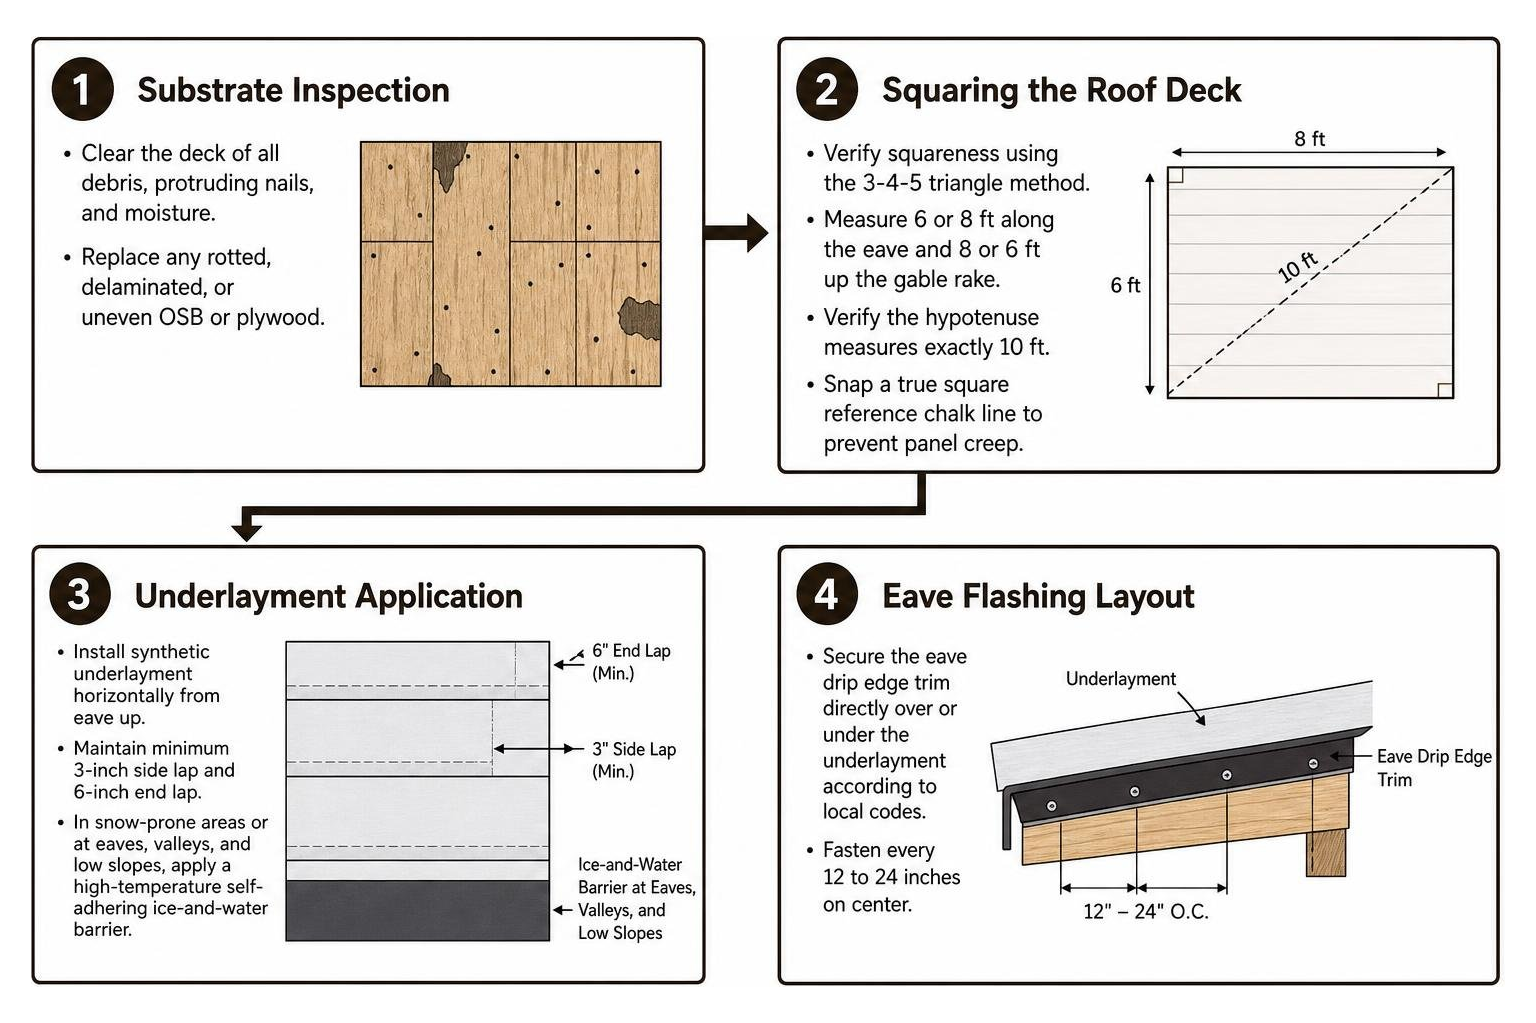
Substrate Inspection: Clear the deck of all debris, protruding nails, and moisture. Replace any rotted, delaminated, or uneven OSB or plywood.
Squaring the Roof Deck: Verify deck squareness using the 3-4-5 triangle method. Measure 6 or 8 feet along the eave from a corner, 8 or 6 feet up the gable rake, and verify the hypotenuse measures exactly 10 feet. Snap a true square reference chalk line to prevent panel creep. If you suspect underlying framing sag or structural issues, schedule a free roof inspection before starting work.
Underlayment Application: Install synthetic underlayment horizontally starting from the eave up, maintaining a minimum 3-inch side lap and 6-inch end lap. In snow-prone areas or along eaves, valleys, and low slopes, apply a high-temperature self-adhering peel-and-stick ice-and-water barrier.
Eave Flashing Layout: Secure the eave drip edge trim directly over or under the underlayment according to local codes, fastening every 12 to 24 inches on center.
Fastening Methods, Panel Hemming, and Flashing Geometry
Precision metal fabrication ensures watertight transitions:
Panel Hemming at Eaves: On standing seam profiles, notch the vertical seam ribs back 3/4 inch at the eave end, trim the flat tab at a slight inward angle, and fold the tab 90 to 180 degrees using a hemming tool. This allows the panel to lock over the eave drip edge trim, avoiding exposed face fasteners.
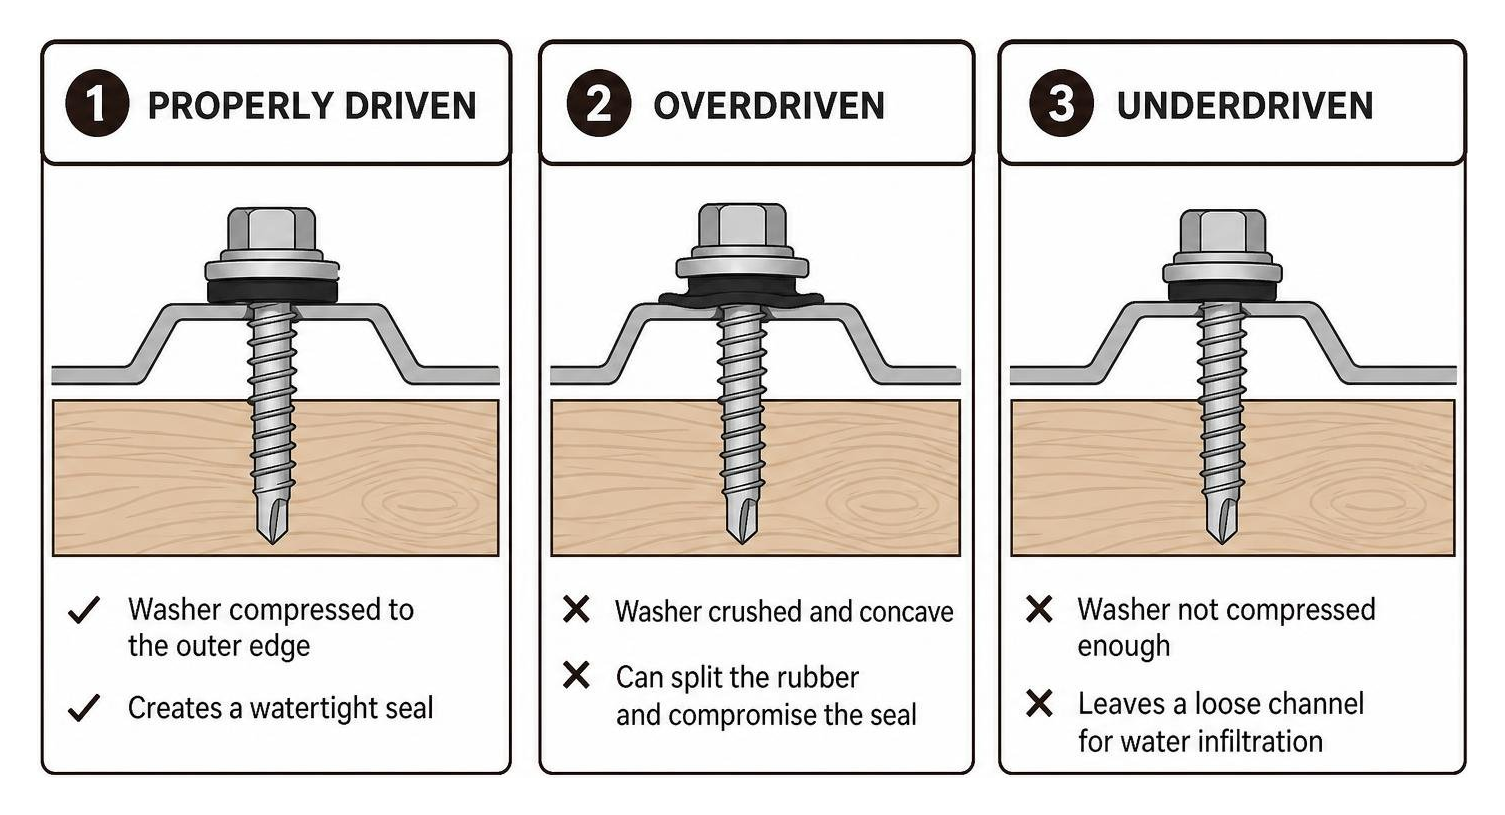
Exposed Fastener Driving Mechanics: When installing ribbed panels, drive fasteners perpendicular to the roof plane using a clutch-driven screw gun equipped with a depth-sensing nosepiece. Fasteners must penetrate solid dimensional wood purlins by at least 1 inch or penetrate plywood/OSB by at least 3/8 inch. Tighten until the EPDM washer compresses slightly to the outer edge of the metal washer cap. Do not overdrive (which crushes the washer into a concave shape and splits the rubber) and do not underdrive (which leaves a loose channel for water infiltration).
Closures and Sealants: Position inside foam closure strips along the eave behind the trim face, embedded in continuous butyl mastic tape. At the ridge, install outside closures and leave a 2-inch gap on each side of the ridge peak for attic ventilation.
Valleys and Sidewalls: Secure valley flashings with concealed cleats. Keep panel valley cut edges set back at least 4 inches from the valley centerline over expandable closure foam. For masonry walls, cut an 1/8-inch reglet groove, insert counterflashing, and seal with high-grade polyurethane or polyether sealant as recommended in the manufacturer guidelines from the technical Installation Guide.
Essential Jobsite Best Practices: Storage, Handling, and Safety
Proper logistical handling on the ground prevents panel damage and jobsite injuries before installation begins.
Essential Tools and Safety Protocols
Metal roofing surfaces are slick, particularly when dusty, wet, or coated with factory rolling oils.
Personal Protective Equipment: Installers should wear clean, soft-soled, non-marking shoes to optimize grip and prevent scratching painted coatings. Clean cotton or cut-resistant gloves protect hands from sharp metal edges while preventing skin oils from staining bare metals.
Fall Protection: OSHA-compliant harnesses, lifelines, and temporary metal-roof anchor clamps must be utilized on all elevated work areas.
Stepping Mechanics: Always step flat-footed in the panel pans (flats) directly over substructure supports. Never walk on high ribs, standing seams, or unsupported overhangs.
Cold-Cutting Protocols: Never use high-speed abrasive chop saws or grinding wheels to cut metal roofing. Abrasive blades generate extreme heat that burns off protective zinc-aluminum coatings, leaving raw edges that rust quickly. Furthermore, hot abrasive sparks embed into adjacent painted panel surfaces, creating unsightly rust spots within months. Use electric power shears, mechanical nibblers, or hand aviation snips.
Jobsite Cleanup: Sweep panels continuously with a soft push broom to remove drill swarf and metal shavings generated during fastening.
Proper On-Site Material Storage and Handling
Improper jobsite storage can ruin a metal roof before it is installed:
Elevated Sloped Storage: Store panel bundles off the bare ground on wooden dunnage, elevating one end 4 to 8 inches higher than the other to promote drainage of trapped condensation.
Breathable Coverings: Cover bundles loosely with breathable canvas tarps rather than non-breathable plastic wraps, which trap humidity and cause wet-storage stain or paint blistering in as little as two weeks.
Handling Protocols: Carry long panels vertically on their edges rather than flat. Carrying panels flat causes them to buckle and warp. When lifting bundles mechanically, ensure pick points are spaced no more than 10 feet apart.
Preventing Common Metal Roof Failures and Leak Points
Most metal roof leaks stem from improper installation rather than material failure. Addressing these common installation mistakes prevents costly callbacks:
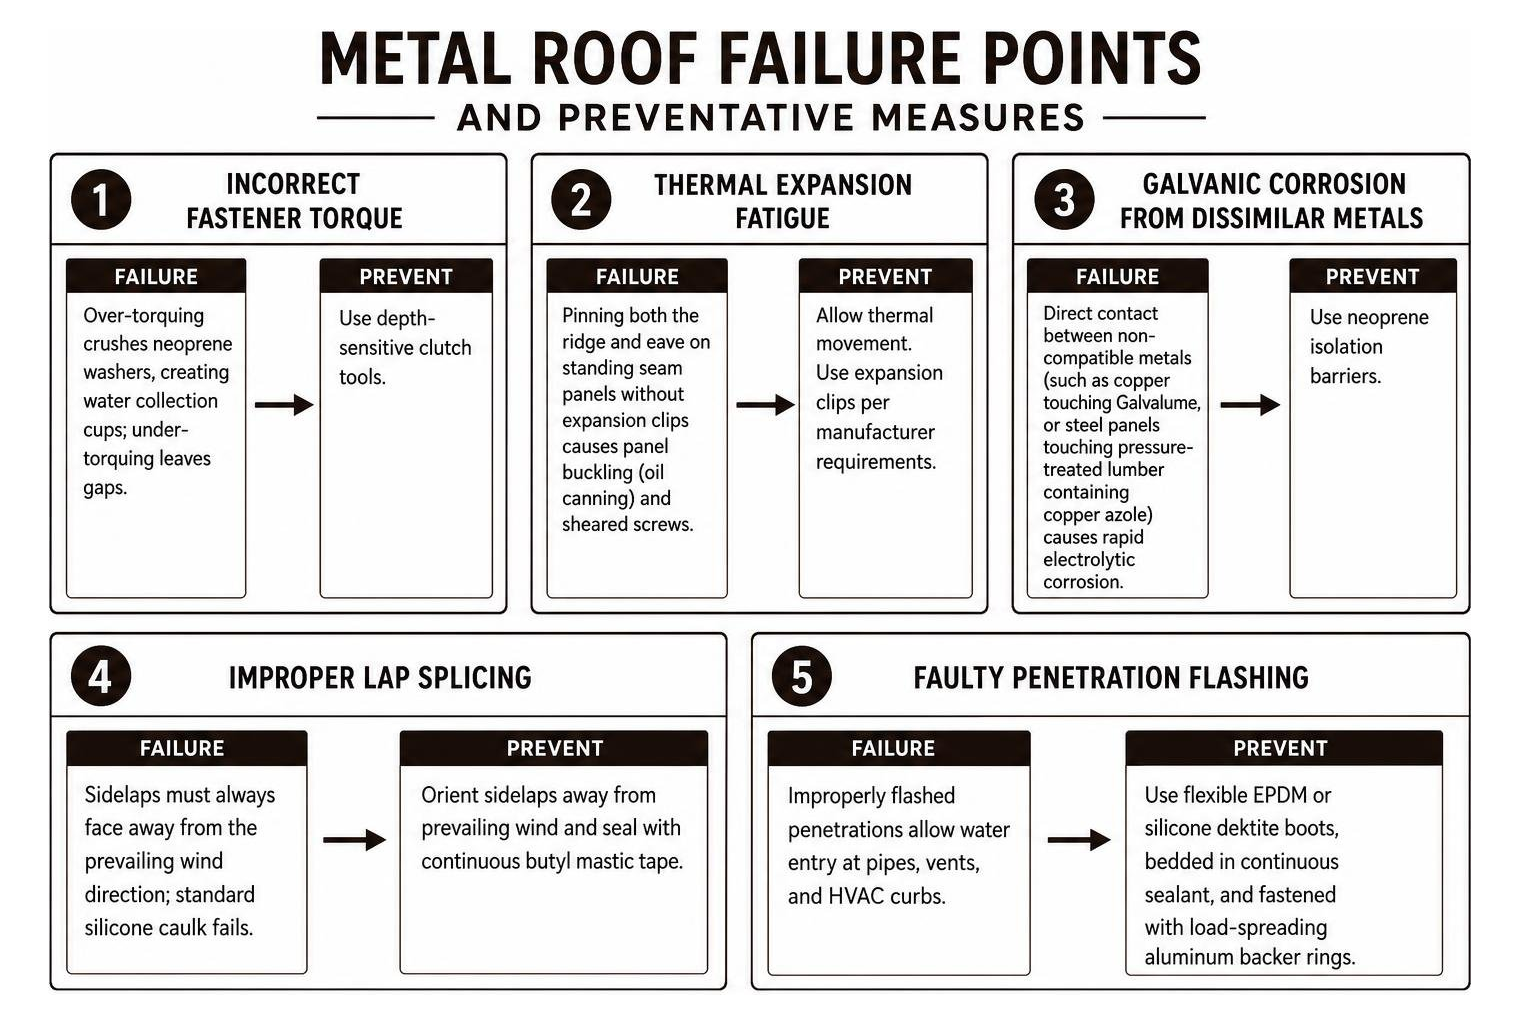
Incorrect Fastener Torque: Over-torquing crushes neoprene washers, creating water collection cups; under-torquing leaves gaps. Use depth-sensitive clutch tools.
Thermal Expansion Fatigue: Long panel runs naturally expand and contract with temperature swings. Pinning both the ridge and eave on standing seam panels without expansion clips causes panel buckling (oil canning) and sheared screws.
Galvanic Corrosion from Dissimilar Metals: Direct contact between non-compatible metals (such as copper touching Galvalume, or steel panels touching pressure-treated lumber containing copper azole) causes rapid electrolytic corrosion. Use neoprene isolation barriers.
Improper Lap Splicing: Sidelaps must always face away from the prevailing wind direction, sealed with continuous butyl mastic tape rather than standard silicone caulk.
Faulty Penetration Flashing: Pipe boots and HVAC curbs must be flashed with flexible EPDM or silicone dektite boots, bedded in continuous sealant, and fastened with load-spreading aluminum backer rings.
Frequently Asked Questions About Metal Roof Installation
How long does a properly installed metal roof last compared to shingles?
A professionally installed metal roof lasts between 40 to 50+ years, and natural metals like copper and zinc can last well over a century. In contrast, standard asphalt shingle roofs typically require replacement every 15 to 25 years. This longevity makes metal a cost-effective choice over the life of a building.
Can metal roofing be installed directly over existing asphalt shingles?
Yes, retrofit installations over a single layer of existing asphalt shingles are permitted by most residential building codes, provided the roof deck is structurally sound and free of rot. Installing 1x4 wood purlins or an approved separation underlayment over the shingles creates a flat, ventilated plane that prevents old shingles from abrading the back of the metal panels.
What causes metal roofs to leak around fasteners?
Fastener leaks are generally caused by four factors:
Fasteners driven at an angle rather than perpendicular to the deck
Over-torqued screws that crush the rubber sealing washer
Under-torqued screws that fail to compress the gasket
Aging neoprene washers degraded by UV exposure after 15 to 20 years
Routine inspections ensure washers remain flexible and sealed.
Conclusion
A metal roof provides exceptional weather resistance, structural strength, and architectural appeal when installed with precision. From verifying roof deck squareness to selecting the ideal panel gauge and executing watertight flashing details, every step directly impacts system longevity.
At Lassiter Roofing Team, our crew brings more than 30 years of hands-on construction and roofing experience to every residential, commercial, and agricultural project across Idaho's Western Treasure Valley. We stand behind our work with individually quoted, competitive pricing and a comprehensive 5-year workmanship warranty on full roof replacements.
If you are planning an upgrade or need trusted expertise for professional metal roof and siding installation in the Treasure Valley, we are here to help. You can easily request free estimate online or contact us today to discuss your project with our roofing specialists.


