


Choosing the Right Chimney Flashing Kit for Your Metal Roof
Choosing Flashing Around Chimney Metal Roof Systems
Flashing around chimney metal roof systems should use layered, profile-matched metal that directs water around the chimney instead of depending on caulk alone. The right kit includes a front apron, side flashing, an upslope back pan or cricket where needed, and counterflashing that protects the roof-to-chimney joint while allowing the metal panels to move with temperature changes.
Metal roofs add a challenge: their long panels expand and contract, while a masonry chimney stays mostly still. A 20-foot steel panel can move about 1/8 inch between seasonal temperature extremes. If the flashing is rigidly fastened, poorly lapped, or not shaped to seal panel ribs, leaks can start at the very place the system should be strongest.
Chimneys are roof penetrations, and penetrations are among the most common locations for roof leaks.
A good flashing kit is not one-size-fits-all. It must match the roof's slope, panel profile, chimney size, and metal type. It also needs compatible materials, since mismatched metals can corrode when exposed to moisture.
I am Kason Walton, owner of Lassiter Roofing Team, with more than 30 years of roofing experience through our team and a background in construction and real estate. In this guide, I will help you evaluate flashing around chimney metal roof options so you can spot the difference between a lasting water-shedding system and a short-term patch.
Components of Flashing Around Chimney Metal Roof Systems
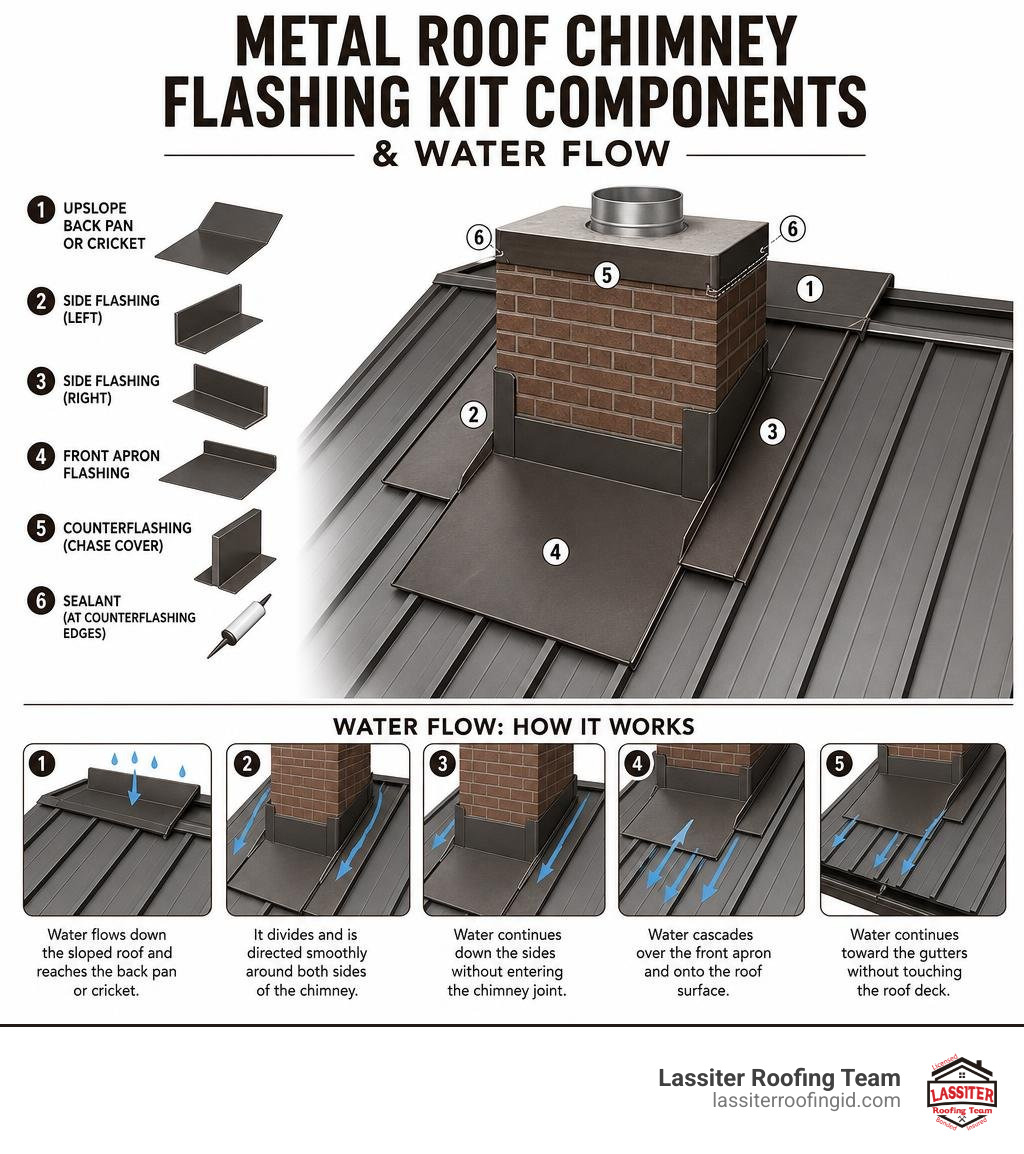
A complete chimney flashing setup is an interconnected system designed to harness gravity. Water flows down the sloped metal roof, meets the top of the chimney penetration, divides smoothly around the sides, cascades down the front, and continues toward the gutters without touching your home's roof deck.
Essential Parts of a Chimney Flashing System
When evaluating a chimney flashing kit or custom setup, you should look for four core structural layers, along with specialized closure trims. Missing even one component compromises the entire barrier.
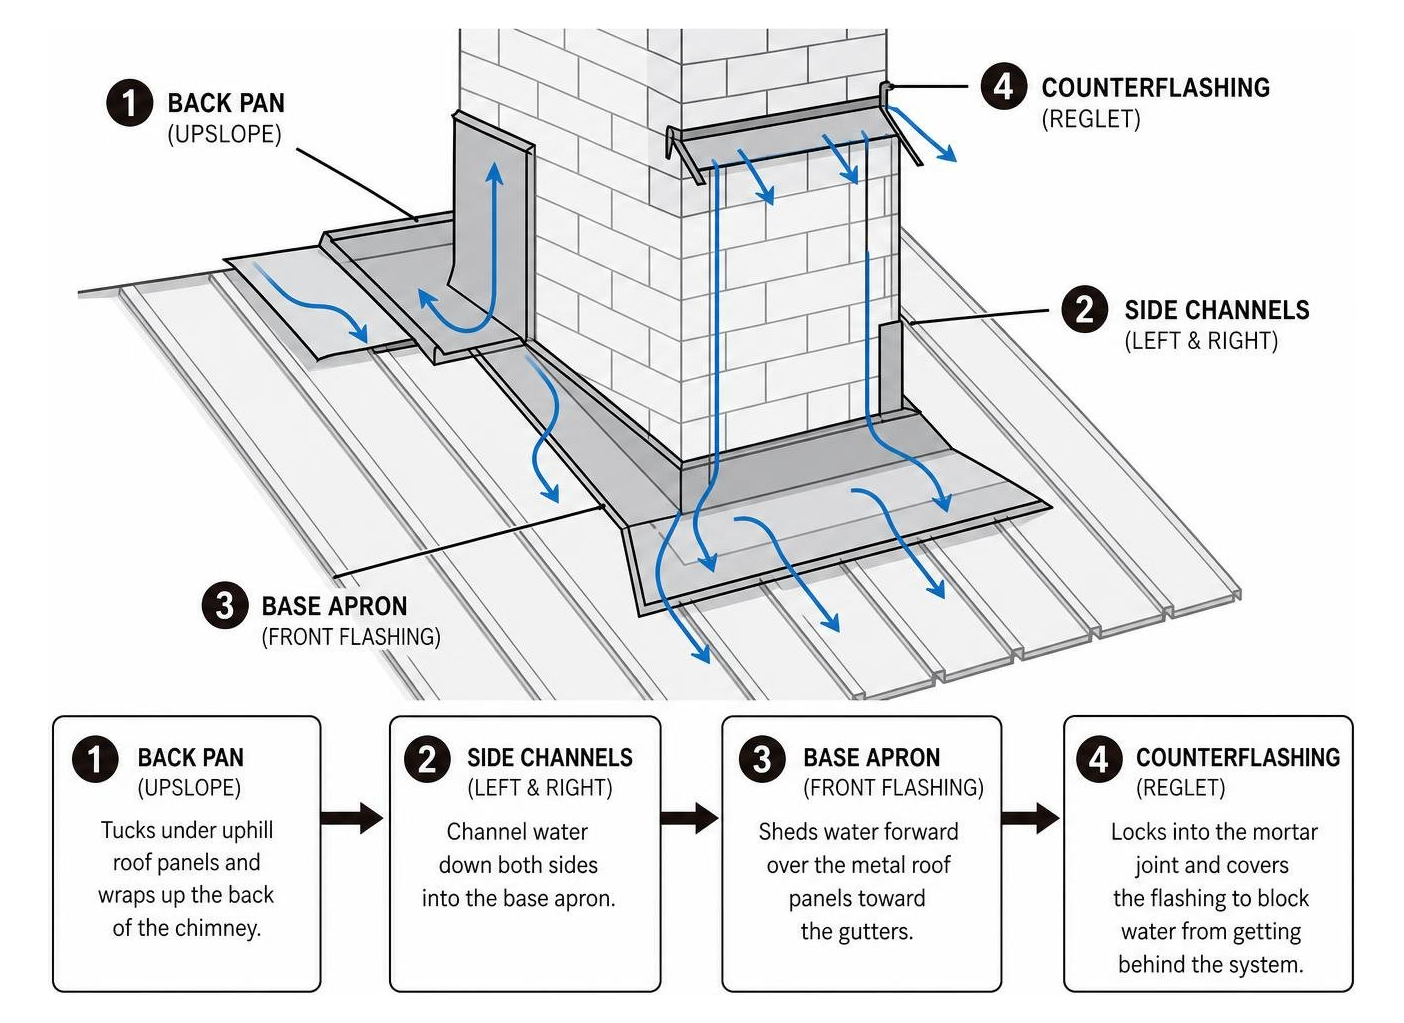
Base Apron (Front Flashing): Fits over the lower metal panels at the downhill face of the chimney. It should extend a minimum of 4 inches up the vertical wall of the chimney and sit flat over the metal roofing ribs to shed water forward.
Side Channels (Step or Side Flashing): Run alongside the left and right walls of the chimney. On metal roofs, these side channels form a protective vertical leg while channeling runoff straight into the pan below.
Back Pan (Upslope Head Flashing): Positioned behind the chimney on the uphill side. It tucks underneath the metal roof panels coming down from the ridge and wraps up the back wall of the chimney by at least 6 to 8 inches to catch incoming water and ice.
Reglet Counterflashing (Cap Flashing): Cuts directly into the masonry mortar joints or framing structure above the base flashing components. Embedded 1 to 1.5 inches deep into a mortar joint (a reglet) and hemmed over, it folds down over the base metal pieces by at least 2 inches to block water from sneaking behind the metal wall legs.
Profile Closure Strips and Butyl Tape: Metal panels feature raised ribs. Custom-cut foam closure strips or butyl tape conform to those exact rib heights, creating an airtight, weather-tight seal beneath the metal flanges.
For a comprehensive breakdown of flashing parts and specs, refer to the Metal Roof Chimney Flashing Component Guide.
Material Selection and Galvanic Corrosion Risks
Choosing the best material for your flashing around chimney metal roof isn't just about color matching—it’s an engineering necessity. When two dissimilar metals come into contact in the presence of water (an electrolyte), an electrical reaction occurs called galvanic corrosion. This process will rapidly eat away the weaker metal, leaving premature rust holes and catastrophic leaks.
Furthermore, raw masonry mortar contains alkaline compounds that chemically attack certain metals. Aluminum, for instance, reacts poorly when embedded directly into fresh mortar or concrete joints, leading to oxidation and pitting over time.
Flashing Material Typical Lifespan Galvanic Compatibility Best Uses & Considerations Galvanized / Galvalume Steel 15–30 Years High with steel panels Cost-effective; match gauges to roof panels. Aluminum 20–40 Years High with aluminum panels Lightweight, but avoid direct contact with wet masonry mortar. 304L Stainless Steel 40–60 Years Universal Outstanding longevity; highly resistant to chemical corrosion. Copper 50–100 Years Low with steel/aluminum Beautiful aesthetic, but must never directly touch steel or aluminum roofs.
Metal Roof Flashing vs. Traditional Roof Flashing
If you’ve ever watched a roofer flash a asphalt shingle roof, you saw individual pieces of step flashing woven between each course of shingles. Flashing a metal roof is an entirely different discipline. Metal roofs consist of continuous, rigid sheets with raised vertical profiles. You cannot simply layer flat shingles over flat metal.
How Thermal Movement Affects Flashing Around Chimney Metal Roof Installations
Metal expands when hot and contracts when cold. A standard 20-foot steel roof panel can easily expand and contract by 1/8 inch across seasonal extremes. During peak summer, a dark metal roof surface can soar to 160°F under direct sunlight, then plunge 40°F in less than an hour when a sudden rainstorm rolls through.
Meanwhile, your brick, stone, or concrete block chimney is fixed firmly to your home's foundation. It doesn't move. This creates dynamic shear stress at the exact junction where the metal roof meets the rigid masonry.
If you rigidly bolt the chimney flashing directly to both the metal panels and the masonry with standard exposed screws, the seasonal movement will shear off the fasteners, tear open screw holes, or split rigid caulking lines. Premium metal roof flashing systems utilize a floating design—where the counterflashing overlaps the base flashing without pinning the metal roof panel to the masonry wall.
Standing Seam vs. Corrugated Roof Integrations
How you seal around the chimney depends heavily on your specific metal panel profile:
Standing Seam Roofs: These systems use raised, locked seams and concealed clip fasteners. Flashing is attached using non-penetrating clamps or hidden Z-bars, allowing the roof panels to glide freely underneath the upslope back pan during thermal expansion.
Corrugated & Exposed Fastener Panels: Corrugated panels have open trapezoidal or wavy ribs. Sealing around these ribs requires custom-bent transition metal and high-density butyl tape closure strips squeezed beneath the flat flashing pans. To learn more about repairing corrugated metal profiles, check out our detailed guide on Corrugated Metal Roof Repair.
How to Diagnose Leaks and Evaluate Flashing Needs

Water is a master of deception. A wet spot on your living room ceiling directly in front of the fireplace doesn't necessarily mean the leak is right there. Water often enters a loose seam higher up the roof slope, runs silently down a wooden rafter or underlayment seam, and finally drips down onto your drywall feet away from the entry point.
When is a Chimney Cricket or Saddle Required?
A chimney cricket (also called a saddle) is a small, ridge-shaped peak built on the uphill side of a chimney. Its sole purpose is to split the incoming sheet of water and debris, redirecting flow to either side of the wide masonry wall.
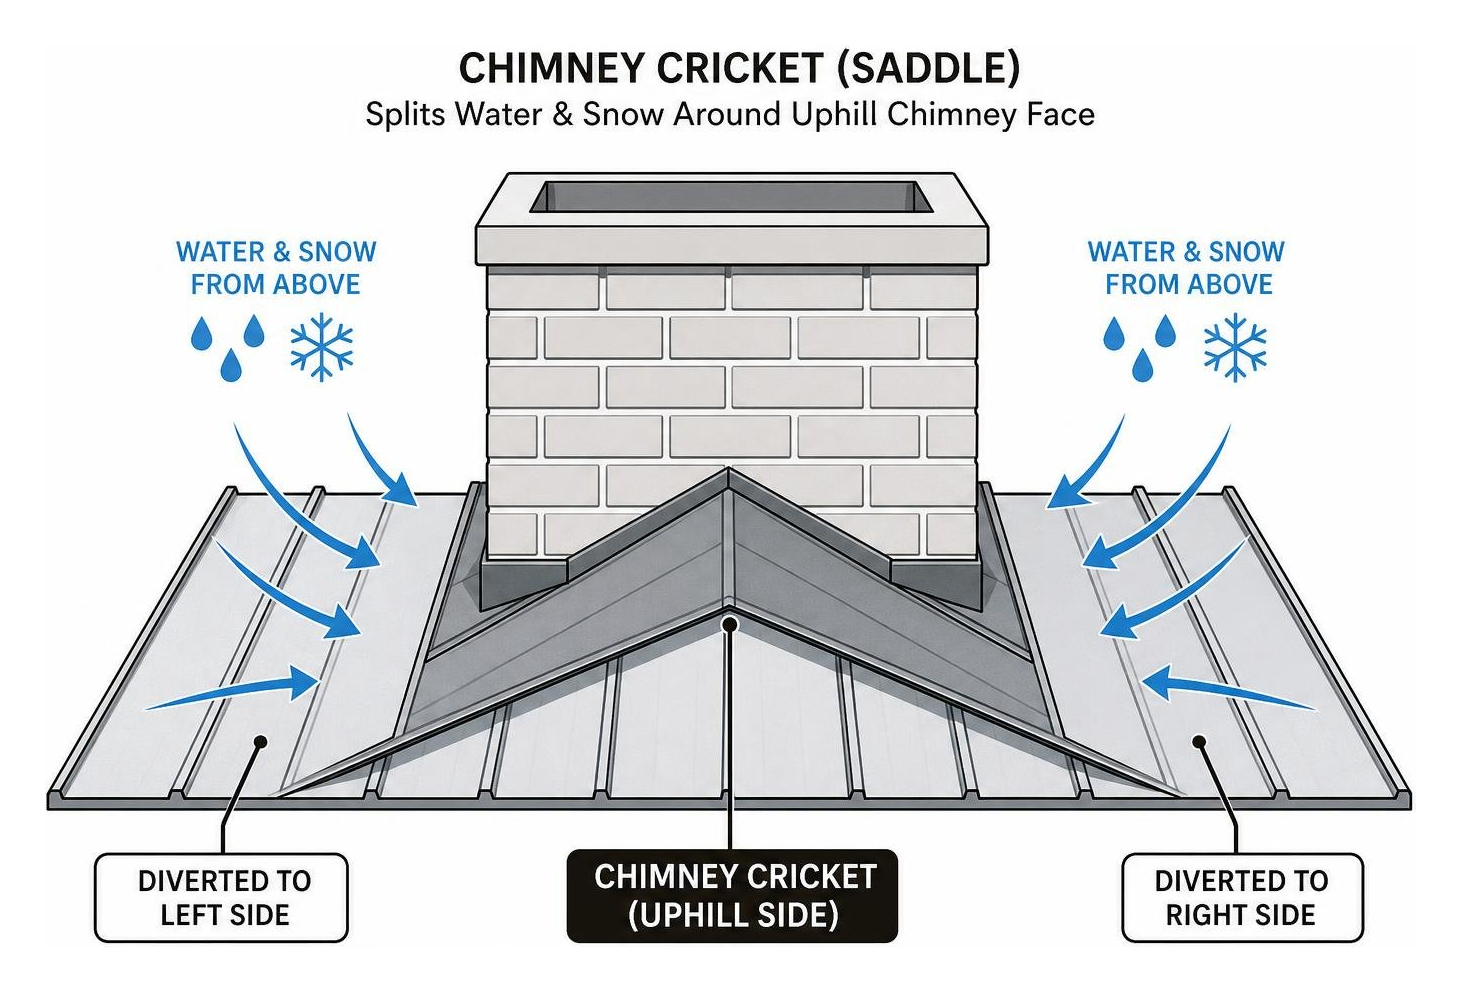
According to the International Residential Code (IRC Section R903.2.2), a cricket or saddle is required whenever the chimney width perpendicular to the slope is 30 inches or wider, unless the chimney directly intersects the main roof ridge.
Even on narrower chimneys (under 30 inches), installing a custom metal cricket on a metal roof is highly beneficial. Without a cricket, wide flat back pans turn into miniature dams during heavy winter snowstorms. Snow and ice pack tightly against the back wall, causing meltwater to pool backward under hydrostatic pressure and break through flashing seams.
Diagnosing Flashing Failure vs. Masonry Degradation
Before spending money on a new flashing kit, you must confirm whether the leak is coming from the metal flashing, or if the chimney itself is absorbing water.
Attic Inspection: Head into the attic during a steady rainstorm with a bright flashlight. Check the wooden framing (trusses and decking) surrounding the chimney brickwork. Dark staining, soft wood, or water lines indicate a flashing or back pan leak.
The Hose Test: Have a partner stand on the ground while you climb up to the roof (using proper safety harnesses). Spray water from a garden hose only onto the base flashing for 10 minutes while your partner watches inside the attic. If no water appears, move the spray head up to the counterflashing, and finally onto the upper brick masonry and crown.
Masonry & Crown Check: Bricks, mortar, and concrete chimney caps are porous. During freeze-thaw cycles, trapped water expands by roughly 9%, causing mortar joints to crumble and bricks to spall. If the masonry itself is cracked, water will soak into the brick interior and bypass your flashing entirely, trickling down inside your walls.
Step-by-Step Reflashing and Common Mistakes to Avoid
Reflashing a metal roof around a chimney requires precision sheet metal work and meticulous waterproofing layering. Here is how professional contractors approach a permanent installation.
Steps for Installing Flashing Around Chimney Metal Roof Systems
Preparation and Masonry Reglet Cutting: Clear away all ancient caulking, tar patches, and damaged metal. Using a diamond-blade angle grinder, cut a horizontal groove (reglet) 1 to 1.5 inches deep into the chimney mortar joint at least 8 to 12 inches above the roof line.
Apply Underlayment Membrane: Lay high-temperature, self-adhering ice and water membrane around the entire chimney base, bringing it up the vertical wall 6 inches and extending it out onto the roof deck.
Install the Base Apron (Downhill): Place the front apron over the downhill metal panel ribs. Seal the underside with heavy-duty butyl tape and secure it with neoprene-washer screws driven into the panel tops.
Fit Side Flashing & Custom Uphill Back Pan: Slide the top edge of the back pan under the upslope metal roof panel. If the chimney is wider than 30 inches, install the metal cricket here. Lay side channels along the vertical chimney sides, ensuring each upper piece overlaps the piece below it by a minimum of 3 to 4 inches.
Seal with Profile Closures: Place solid profile foam closure strips infused with butyl sealant beneath all lower metal overlaps to prevent wind-driven rain from blowing backward under flat metal flanges.
Insert Counterflashing with Soft Bends: Insert custom counterflashing pieces into the cut mortar reglet. Secure the flange inside the mortar joint using metal expansion wedges or masonry anchors, then fold the outer lip down using smooth, soft bends.
For advanced techniques on forming durable sheet metal edges, consult the Winged Flashing and Soft Bends Guide.
Common Mistakes to Avoid During Installation
Relying on Caulk as the Primary Barrier: Slathering silicone or asphalt mastic over a leak is a temporary patch, not flashing. Sunlight degrades standard hardware store sealants in just a few years, causing them to shrink, crack, and fail.
Reverse Lapping (Water Traps): Always layer components like shingles on a roof—upper pieces must always overlap lower pieces on the exterior side. Slipping an uphill metal piece under a downhill flange creates an open pocket that invites water right into the attic.
Leaving Out Profile Closure Strips: Omitting profile closure strips on corrugated or ribbed metal panels leaves wide open gaps underneath the flashing flange, welcoming insects, drafts, and wind-driven rain.
Rigidly Binding Floating Joints: Over-screwing side flashings directly into both the metal panels and the chimney wall prevents natural thermal movement, eventually popping screw heads off during seasonal shifting.
Maintenance Guidelines and Cost Considerations
Proper maintenance protects your home investment. According to the U.S. Department of Housing and Urban Development (HUD), moisture is one of the primary drivers of structural residential damage and toxic indoor mold growth. Addressing minor leaks quickly saves thousands in structural framing and ceiling repairs down the road.
Expected Costs for Repair, Reflashing, and Crickets
The cost of fixing or replacing flashing around chimney metal roof penetrations varies based on roof pitch, accessibility, chimney size, and whether custom metal fabrication is required.
Repair Scope Estimated Cost Range Average Time What Is Included? Minor Sealant Touch-Up & Inspection $300 – $800 2 – 4 Hours Cleaning old top sealants, tightening loose fasteners, replacing compressed washers. Full Reflashing Replacement $800 – $2,500 1 Day Removal of surrounding panels, reglet recutting, new base/counterflashing installation. Custom Cricket Construction $1,500 – $3,500 1 – 2 Days Building wood framing structure uphill, installing custom-fabricated metal cricket pan. Masonry Repointing & Crown Repair $500 – $4,000 1 – 3 Days Repairing cracked mortar joints, sealing porous brick face, rebuilding cracked concrete crowns.
Preventive Maintenance and Inspection Routines
We recommend performing a brief chimney flashing check twice per year—once in the spring and once in the late autumn before heavy winter storms hit:
Clear Organic Debris: Pine needles, autumn leaves, and twigs easily collect in the uphill back pan behind your chimney. Trapped organic matter holds moisture against the metal panels and accelerates rust formation.
Inspect Neoprene Washers: Check exposed metal roofing screws along the flashing flanges. Sun exposure eventually dries out neoprene rubber washers, causing them to crack or back out.
Check Reglet Mortar Seals: Inspect the flexible poly-sulfide or polyurethane sealant line along the top counterflashing reglet groove. If you notice cracking, carefully scrape away loose material and re-apply a high-performance tri-polymer roofing sealant.
Frequently Asked Questions About Metal Roof Chimney Flashing
Why does my metal roof leak around the chimney only during heavy rain?
During light rain showers, water flows down the roof panels quickly without building up volume. However, during intense downpours or wind-driven rainstorms, water stacks up behind the chimney face. Hydrostatic pressure forces standing water laterally through unsealed panel seams or underneath flashing flanges that lack compressed butyl tape or profile closure strips.
Can I rely on caulking or roof cement to fix a chimney leak on a metal roof?
No. Applying thick roofing cement or standard store-bought silicone caulk is a short-term emergency band-aid at best. Because metal roof panels expand and contract continuously with daily temperature swings, rigid caulking bonds will break within a single season. A reliable fix requires mechanical sheet metal layers folded to shed water naturally by gravity.
What is the lifespan of chimney flashing on a metal roof?
When properly designed with high-quality metals (such as Galvalume, stainless steel, or aluminum) and fitted with thermal expansion allowances, chimney flashing can last 30 to 50+ years—matching the lifespan of the metal roof itself. However, secondary sealants, neoprene washers, and butyl closure strips should be inspected and serviced every 10 to 15 years.
Conclusion
Getting the flashing around chimney metal roof penetrations right requires understanding material compatibility, layering water-shedding components, and allowing for metal's natural thermal movement. Bypassing critical parts—like skipping an uphill cricket on a wide chimney or trusting caulk as a primary seal—will inevitably lead to costly water stains, ruined insulation, and structural repairs.
At Lassiter Roofing Team, we bring over 30 years of hands-on roofing experience across Idaho's Treasure Valley. We stand behind our craftsmanship with custom individual project quotes and an industry-leading 5-year workmanship warranty on residential, commercial, and agricultural metal roofing installations.
If you are dealing with a persistent chimney leak or planning a new metal roof installation, don't leave your home's protection to guesswork. Contact our expert team today for Professional Roofing Services in Idaho and let us safeguard your roof for decades to come.


