


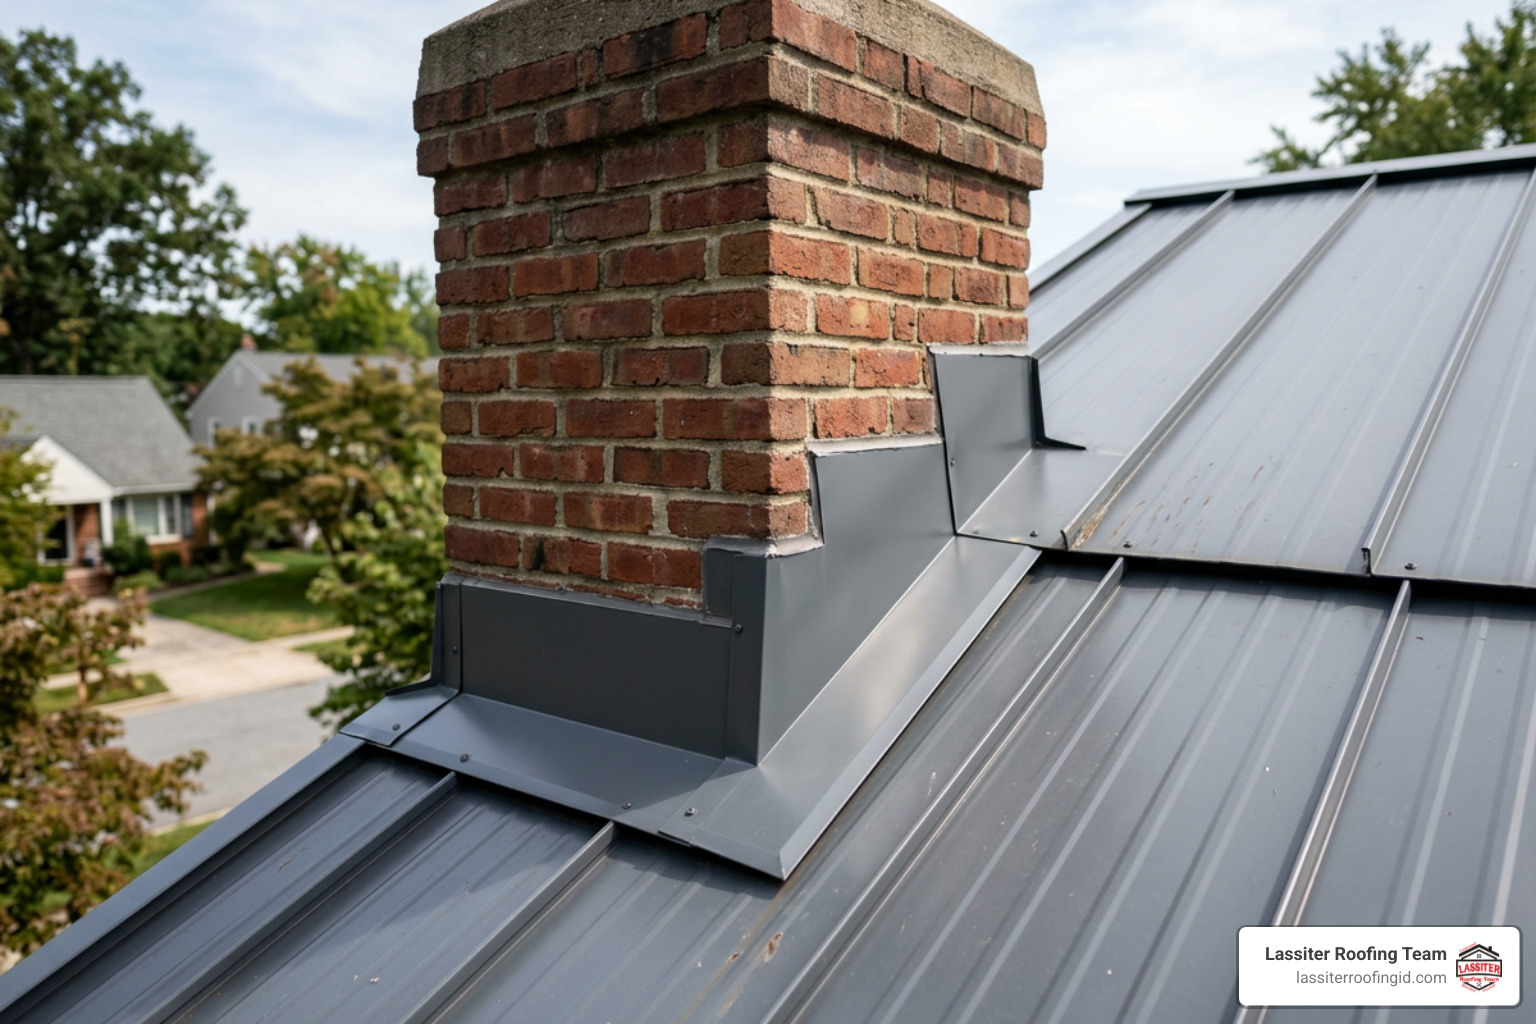
Preventing Leaks: Flashing a Chimney on a Metal Roof
Why Flashing a Chimney on a Metal Roof Is One of the Most Critical Details on Your Home
Flashing a chimney on a metal roof is one of the most leak-prone details in any roofing system — and getting it wrong is expensive. Here is what you need to know right away:
Quick Answer: How to Flash a Chimney on a Metal Roof
Choose compatible materials — match your flashing metal to your roof panels or use galvanically compatible stainless steel
Install base flashing — slide it under upper panels and over lower panels, with a minimum 4-inch turn-up against the chimney wall
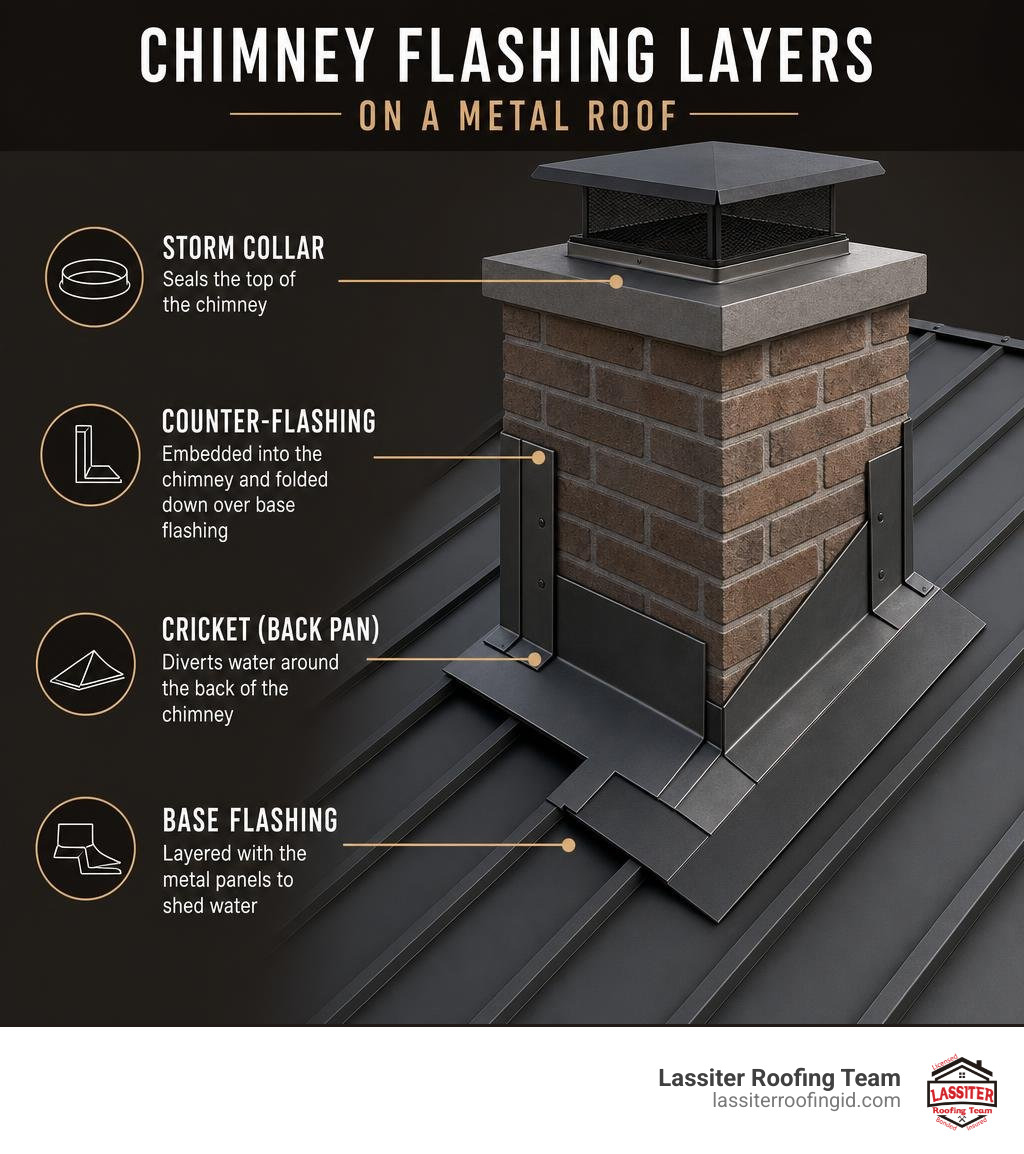
Add a back pan or cricket — required by code when your chimney is wider than 30 inches
Embed counter-flashing — cut a reglet into the chimney mortar and fold counter-flashing down over the base flashing
Seal with the right products — use butyl tape at panel laps and neutral-cure silicone at masonry joints
Allow for thermal movement — never rigidly lock flashing down; metal panels can move roughly 1/8 inch over a 20-foot length between seasons
Inspect annually — check before winter and after major storms
The chimney-to-roof junction is consistently one of the most common sources of roof leaks in residential construction. On a metal roof, the challenge is even greater. Unlike shingles, metal panels expand and contract significantly with temperature swings, and their raised ribs or standing seams make standard flat flashing methods unreliable. A joint that looks sealed in summer can crack open by January.
The good news: with the right materials, proper layering, and a design that accounts for panel movement, a metal roof chimney flashing system can last decades.
I'm Kason Walton, owner of Lassiter Roofing Team, and with over 30 years of combined roofing experience serving Idaho's Western Treasure Valley, my team handles flashing a chimney on a metal roof as part of our core residential and agricultural roofing work. In this guide, I'll walk you through everything you need — from material selection to step-by-step installation — so you can protect your home the right way.
Metal vs. Shingle Roof Chimney Flashing: Core Differences
When homeowners transition from asphalt shingles to a durable metal roof, they often assume that chimney waterproofing works the same way on both systems. In reality, the mechanics are drastically different.
On a standard shingle roof, roofers install small, L-shaped pieces of metal called step flashings (often referred to as "soakers" or "baby tins"). These pieces are 3 inches wide, 3 inches tall, and 9 inches long, and they are woven directly into individual courses of shingles as the roof is built up the slope. Water flows naturally off each shingle course onto the step flashing and down the roof deck.
A metal roof doesn't have small overlapping courses every 5 to 7 inches. Instead, it consists of continuous metal panels running from the ridge down to the eave. You cannot weave step flashing into a continuous steel or aluminum sheet. Instead, flashing a chimney on a metal roof requires custom-formed transition pieces that wrap around the chimney, bridge the gap across raised ribs or standing seams, and manage bulk water flow around the structure.
Flashing Feature Shingle Roof Flashing Metal Roof Flashing Side Waterproofing Method Interwoven step flashing (soakers) per course Continuous custom side transitions or back-pan extensions Panel Integration Layered under individual asphalt shingle courses Integrated into standing seams or flat panel decks using butyl closures Thermal Expansion Management Minimal; shingles flex and absorb small movements Critical; metal panels expand up to 1/8 inch per 20 feet Masonry Interface Counter-flashing set into mortar reglet (1 to 1.5 inches) Two-part system: floating base flashing + rigid reglet counter-flashing Rib/Profile Gap Sealing N/A (flat asphalt substrate) Requires custom foam closures, butyl tape, and profile-matched boots
For a deeper dive into common flashing components, check out this comprehensive Metal Roof Chimney Flashing - Roofing Component Guide | CapOut.
Understanding Thermal Expansion and Panel Profiles
The single biggest technical reason chimney flashings fail on metal roofs is thermal expansion. A standard 20-foot steel roof panel will expand and contract by roughly 1/8 inch between extreme winter cold and peak summer heat. If you rigidly bolt a chimney flashing to both the roof deck and the chimney masonry using face-screws and rigid caulk, the daily movement of the metal roof will shear the screws, tear the sealant, or buckle the flashing metal.
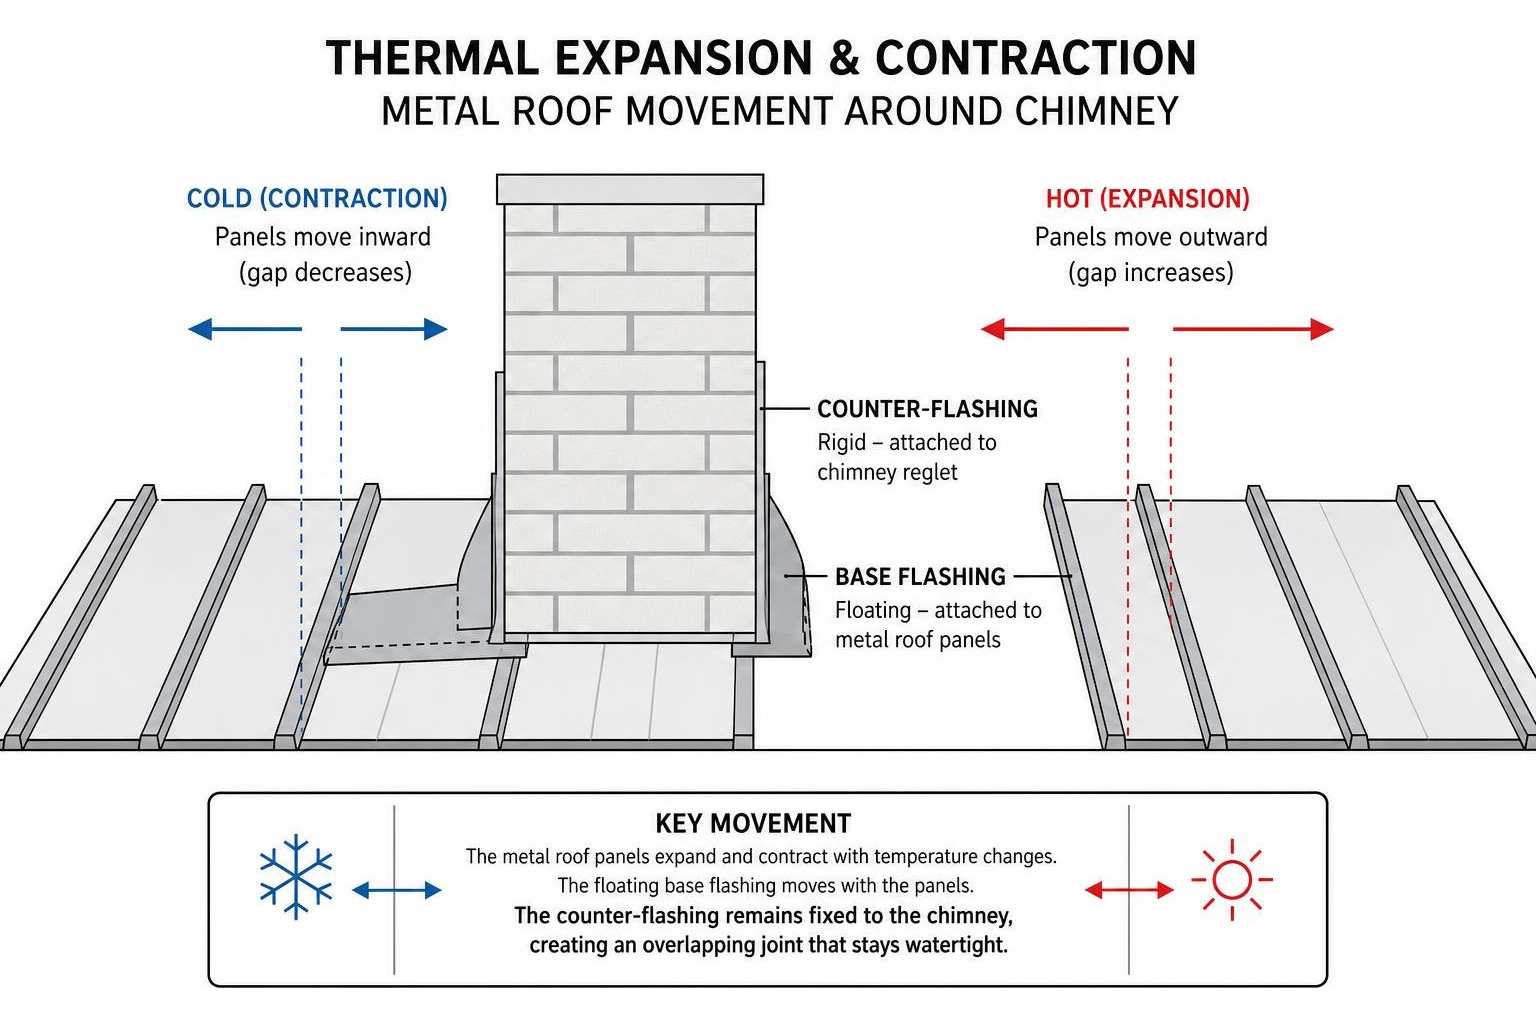
To solve this, we utilize a two-part two-piece flashing design:
The Base Flashing Assembly (Floating Element): Attached directly to the metal roof deck or panel surface. It moves freely with the metal roof as ambient temperatures fluctuate.
The Counter-Flashing / Cap Flashing (Rigid Element): Embedded 1 to 1.5 inches deep into a saw-cut mortar joint (reglet) on the chimney wall. It hangs down 2 to 4 inches over the base flashing without being mechanically fastened to it.
This overlapping sliding joint creates a completely watertight seal while allowing the house structure, chimney masonry foundation, and metal roof panels to move independently.
Types of Chimney Flashing and Material Compatibility
When planning your project, you must choose a flashing method that matches your roof profile and chimney type:
Custom Architectural Metal Kits: Ideal for brick, stone, or stucco masonry chimneys. These kits feature three or four prefabricated custom metal parts: a front apron, two side pieces (or continuous pan transitions), and a rear back-pan or cricket.
Flexible Rubber or EPDM Boots: Used primarily for round metal Class A stove pipes or double-wall insulated chimneys penetrating through metal roofs. High-temperature silicone boots (rated for extreme flue temps) feature a flexible aluminum base ring that molds directly into ribbed or corrugated metal profiles.
Prefabricated Metal Flashing Assemblies: Kits like the Rock-Vent Metal Roof Flashing feature galvalume or 304L stainless steel base plates with integrated metal cones and storm collars. They provide a sleek appearance on standing seam panels and handle roof pitches ranging from flat up to 12/12 slope.

Choosing the Right Materials for Flashing a Chimney on a Metal Roof
Matching the chemical composition of your flashing to your roofing system is vital. Selecting an incompatible metal will spark rapid deterioration.
304L Stainless Steel: The gold standard for chimney flashing. It lasts 40 to 60+ years, provides exceptional resistance to soot acids and salt air, and is galvanically safe with almost all standard steel metal roof panels.
Galvalume & Galvanized Steel: Highly cost-effective and built to match standard exposed-fastener ribbed panels. Galvanized steel flashing provides a 15 to 30+ year service life, while Galvalume extends that durability significantly.
Copper: A premium architectural choice lasting 50 to 100 years. Copper joints can be fully soldered for zero-leak security. However, copper must never come into direct contact with aluminum or galvalume steel panels.
Aluminum: Lightweight and easy to form in the field, lasting 20 to 40 years. Note: Aluminum should never be embedded directly into concrete or mortar reglets, as the alkali in wet mortar aggressively corrodes raw aluminum.
For practical steps on choosing the right material for your project, read this DIY: How to Flash a Chimney with a Metal Roof - Guide.
Preventing Galvanic Corrosion and Sealant Degradation
Galvanic corrosion occurs when two dissimilar metals come into contact in the presence of an electrolyte, such as rainwater. The less noble metal acts as an anode and corrodes at an accelerated pace. For instance, pairing copper flashing directly with an aluminum or steel roof will rapidly destroy the surrounding roof panel, leaving gaping holes around your chimney.
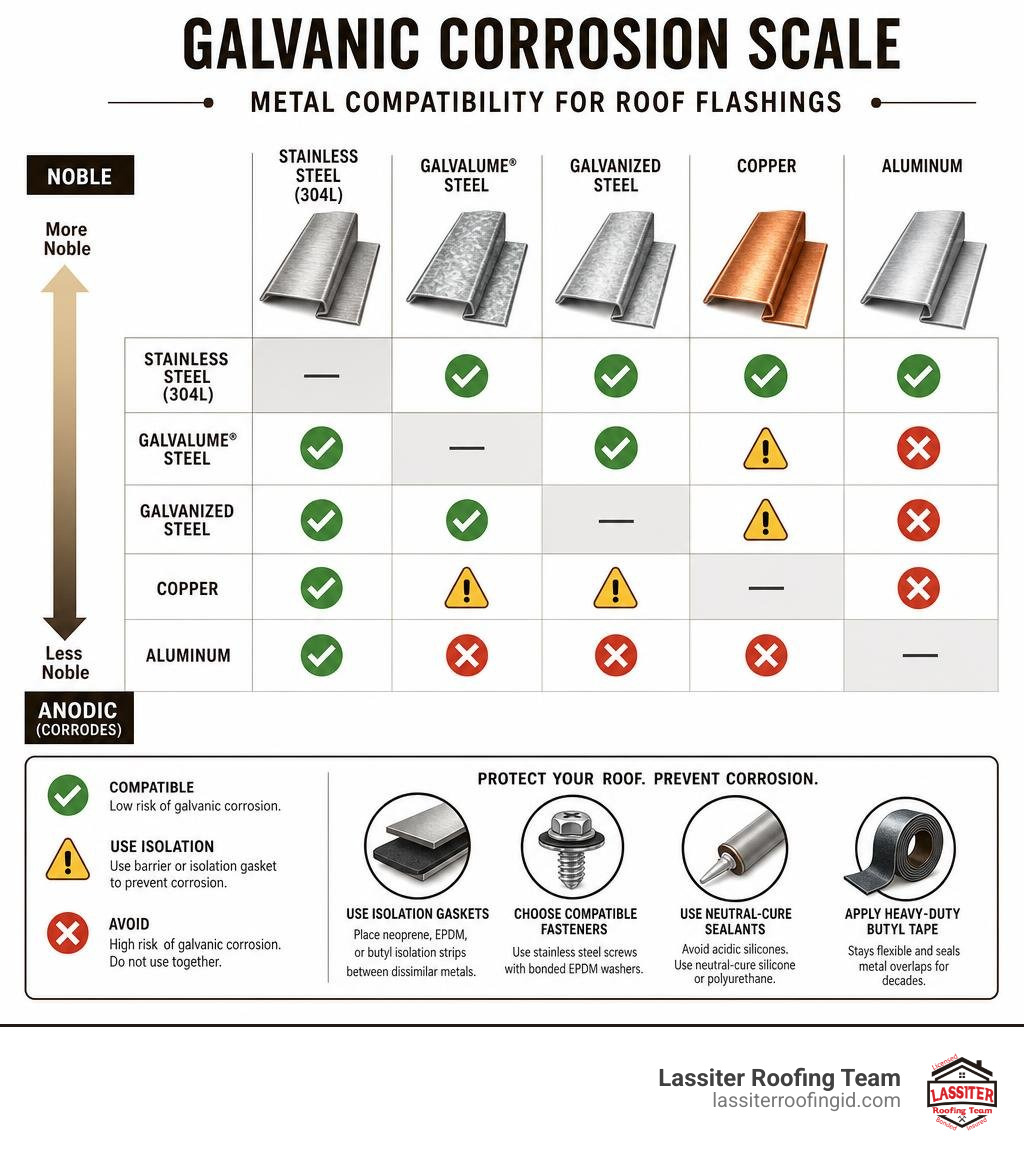
To prevent galvanic corrosion and premature joint failure:
Use Isolation Gaskets: Place neoprene, EPDM, or butyl isolation strips between dissimilar metal components.
Choose Compatible Fasteners: Secure stainless steel flashing with 304 stainless screws equipped with bonded EPDM washers. Never use raw carbon steel screws on a metal roof.
Avoid standard acidic silicones: Standard acetoxy-cure silicone caulks release acetic acid during curing, which causes rapid pitting rust on galvalume and steel panels. Always use neutral-cure 100% silicone or polyurethane sealants.
Incorporate Heavy-Duty Butyl Tape: Unlike liquid caulks that dry out and crack within 3 to 5 years under intense UV radiation, high-grade butyl tape remains pliable and sticky for decades, sealing metal-to-metal panel overlaps cleanly.
Step-by-Step Guide to Flashing a Chimney on a Metal Roof
Proper installation requires careful measuring, precise cutting, and zero shortcuts. Before starting, gather your safety harness, ladder standoffs, tin snips, hand seamers, angle grinder with a diamond masonry blade, cordless driver, butyl tape, neutral-cure silicone, and stainless steel fasteners.
Installing the Base Flashing and Water Diverter
Here is the step-by-step process for establishing the base layer of protection when flashing a chimney on a metal roof:

Prepare the Roof Deck and Penetration: Ensure underlayment (preferably a high-temperature self-adhering ice and water shield) extends at least 8 to 12 inches up the vertical walls of the chimney before laying metal panels around the sides.
Install the Front Apron Flashing: Place the front apron flashing on top of the lower metal roof panel across the front face of the chimney. The vertical leg must extend a minimum of 4 inches up the chimney wall, while the bottom flange extends 4 to 6 inches over the lower roof panel deck. Secure it using butyl tape along the bottom edge and stainless steel hex-head screws.
Fit Profile Closure Strips: Place pre-cut, profile-matched foam closure strips coated with neutral-cure silicone underneath the lower edge of the front apron to block wind-driven rain from blowing up into the panel ribs.
Install Side Flashing Pans: Fit side flashing channels alongside the left and right walls of the chimney. The top edge slides under the upper roof panels, while the lower lip overlaps the front apron flashing in a gravity-assisted water-shedding direction (never reverse-lapped).
Fabricate and Secure the Rear Back-Pan (or Cricket): On the uphill side of the chimney, install a back pan that extends at least 12 to 18 inches up the roof slope under the upper metal roof panels. Secure butyl sealant tape across all metal-to-metal overlap points.
For more information on safety and installation steps, review Installing a Chimney Through a Metal Roof: Flashing, Sealing, and Safety – New England Metal Roof.
Securing Counter-Flashing and Storm Collars for Flashing a Chimney on a Metal Roof
Once your base assembly is secured to the roof panels, it is time to install the upper defense system against water entry:
Cut the Mortar Reglet: Using an angle grinder with a diamond masonry blade, cut a continuous groove 1 to 1.5 inches deep into a horizontal mortar joint around the perimeter of the chimney, approximately 8 inches above the roof line. Clear out all dust and loose mortar debris using a stiff brush.
Form and Insert Counter-Flashing: Fold the top edge of your counter-flashing piece into a 90-degree flange (or a hemmed lip). Push this lip deep into the cut reglet joint.
Drive Masonry Anchors or Flashing Hooks: Lock the counter-flashing into the reglet using lead wedges or stainless masonry expansion anchors.
Seal the Reglet Joint: Fill the reglet groove completely with polyurethane masonry caulk or neutral-cure silicone, smoothing the surface so water sheds off cleanly.
Install Storm Collars on Pipe Flues: If you are flashing a round metal chimney pipe, slide a fitted storm collar down the pipe until it rests snugly over the top cone of your rubber boot or prefabricated metal base flashing. Apply a continuous bead of high-temperature silicone caulk around the top seam of the storm collar.
Special Profile Integration and Water Management Techniques
Metal roofs are not flat, and managing water around raised panel profiles requires specialized waterproofing details.
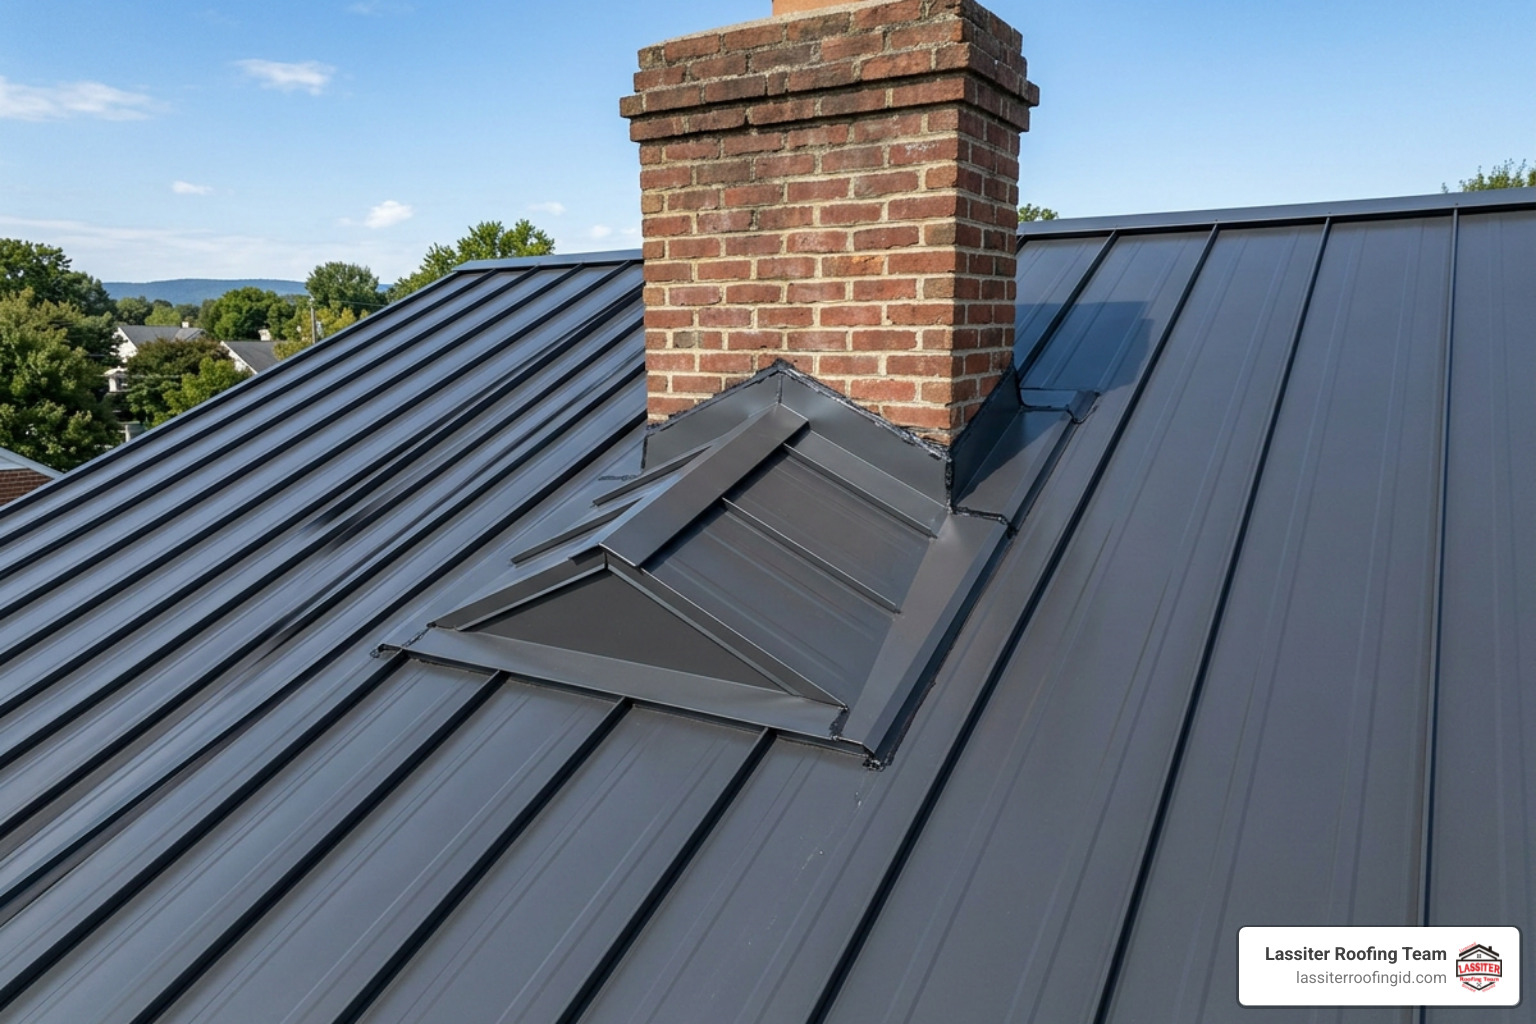
Handling Standing Seam and Corrugated Ribs
Standing seam metal roofs present a unique advantage: they feature zero exposed face-fasteners across the main roof deck. However, flashing a chimney penetration requires careful handling so you don't compromise those clean seams:
Avoid Cutting Seams Unnecessarily: Whenever possible, layout panel penetrations so chimney walls fall between standing seams.
Use Clamp-On Mounting Systems: On standing seam panels, utilize non-penetrating seam clamps to hold back-pan edges down tightly without drilling holes through the floating seam ribs.
Panel Slitting Technique on Corrugated Panels: When working with exposed-fastener corrugated or 3-foot ribbed metal panels, roofers often cut a horizontal slit into the metal panel at the upper midpoint of the chimney opening. The top section of flat back-pan metal slides underneath the upper metal panel sheet, while the lower side flanges rest on top of the lower panel ribs.
Apply Profile Foam Closures: Always sandwich profile-matched foam closure strips between the flat flashing plate and the lower corrugation ribs. This prevents wind, driven snow, and insects from entering underneath the flat sheet.
To troubleshoot existing roof leaks around various panel profiles, check out Metal Roof Around Chimney: Flashing, Fixes, & Leak Prevention - The Soul Nook.
When to Install a Chimney Cricket
A chimney cricket (also referred to as a roof saddle) is a small, elevated peak structure installed on the uphill side of a chimney. Its sole purpose is to split surface water runoff and sliding snow, directing it around the sides of the chimney rather than letting it pool behind the flat vertical back wall.
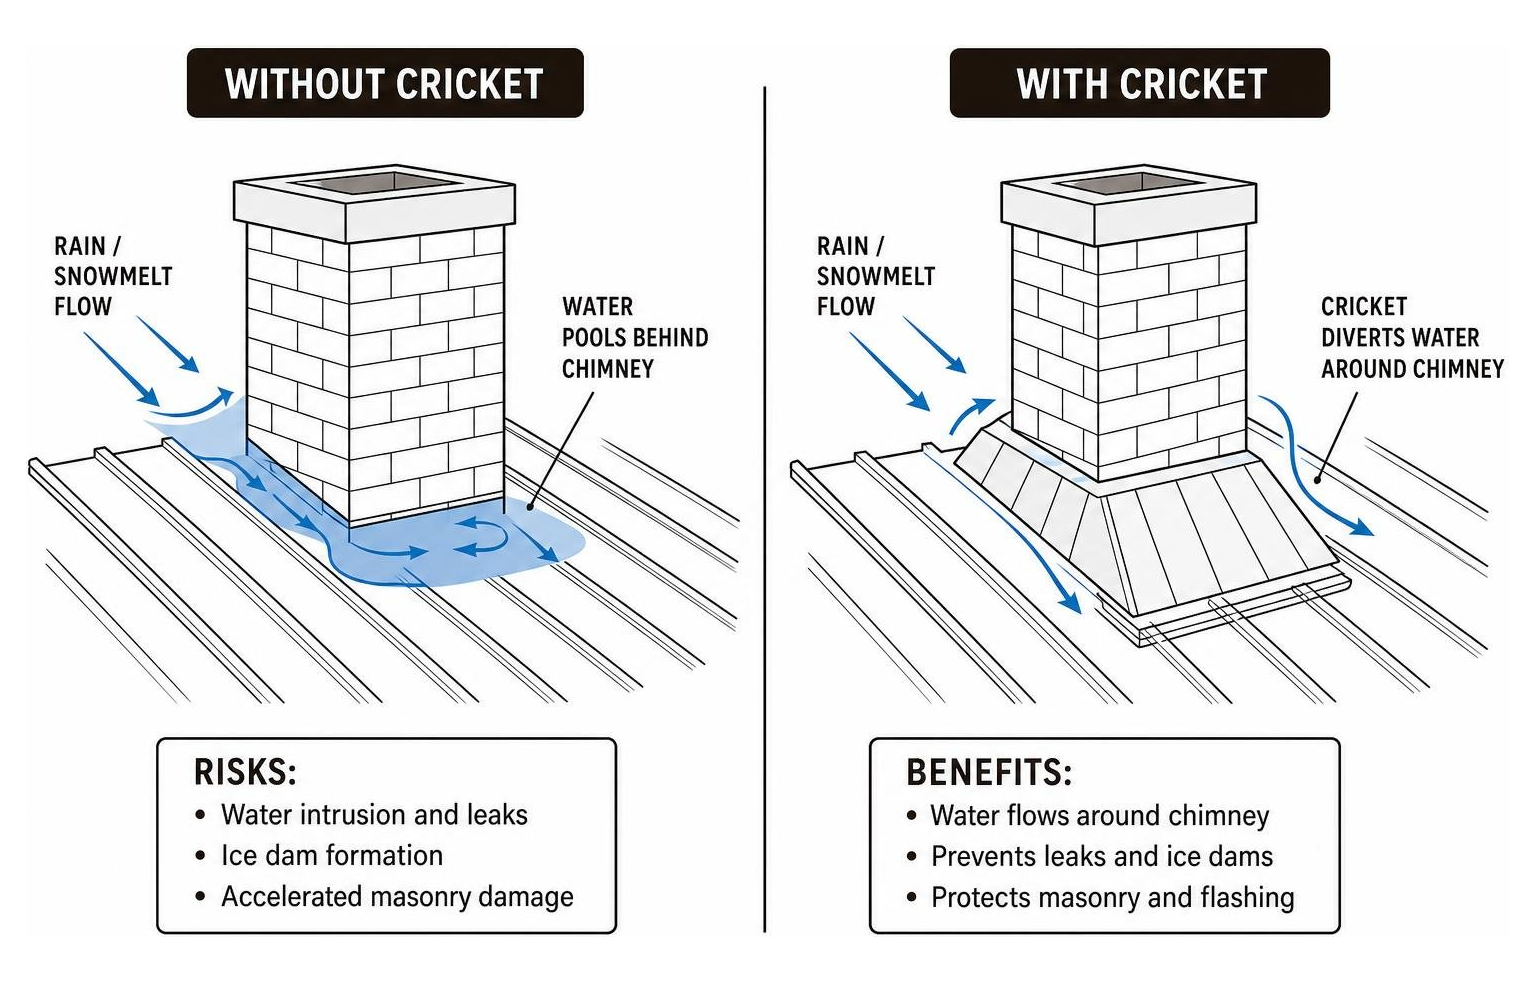
IRC Code Requirement: The International Residential Code (IRC) mandates the installation of a cricket on any chimney wider than 30 inches (measured perpendicular to the roof slope).
Pitch Factors: On low-slope roofs, water drains slowly. Even if a chimney is under 30 inches wide, building a back pan with an integrated divert wedge prevents pine needles, leaves, and ice from backing up behind the chimney wall.
Snow Wedges on Metal Roofs: Because metal roofs shed large sheets of snow quickly during thawing cycles, heavy snow slides can slam into the back of an un-protected chimney flue pipe, crushing the pipe or tearing the base flashing right off the roof. Installing an angled steel snow wedge upstream of the pipe diverts sliding ice blocks safely around the penetration.
Frequently Asked Questions About Chimney Flashing
Can a homeowner DIY chimney flashing on a metal roof?
While handy homeowners can perform basic maintenance — like clearing debris or replacing dried-out storm collar caulking — complete chimney flashing on a metal roof is best left to experienced professionals. Metal roof flashing requires specialized tools like hand seamers, sheet metal brakes, and diamond-blade grinders, along with precise knowledge of thermal movement, reglet cutting, and soldering techniques. Improper installation can trap water behind panels, rot your ceiling deck, and void your metal roof warranty.
Why does a chimney on a metal roof leak only during heavy rain?
A chimney that only leaks during severe downpours or wind-driven rain usually indicates a water management capacity issue rather than a wide-open hole. Common culprits include:
Omitted Foam Closures: Wind pushes rain horizontally under the flashing plate through open panel rib gaps.
Missing or Undersized Cricket: Heavy rainfall pools behind the wide flat pan on the uphill side of the chimney, rising above the 4-inch vertical turn-up lip and flowing over the underlayment.
Reverse Lapped Panels: Lower flashing pieces were lapped over upper panels instead of under them, creating a lip that catches surface runoff during heavy rain volume.
When is a chimney cricket required by building code?
Under standard International Residential Code (IRC) regulations, a cricket or saddle is mandatory whenever the chimney width is greater than 30 inches, measured parallel to the ridge. However, on metal roofs in cold climates with heavy snow accumulation, roofing contractors routinely install crickets or snow diverters on chimneys of any width to protect the flashing joints from destructive snow slides and freeze-thaw ice dams.
Conclusion
Flashing a chimney on a metal roof is a precise art that blends structural carpentry, custom sheet metal fabrication, and waterproofing design. By selecting galvanically compatible metals, implementing a true two-part floating base and counter-flashing system, accommodating thermal expansion, and managing uphill water with a dedicated cricket, you ensure your metal roof remains leak-free for decades.
Perform a visual inspection of your chimney flashing twice per year — every spring and fall — checking for loose reglet caulk, degraded washer gaskets, or leaf buildup behind the back pan.
If you're noticing ceiling spots, damp insulation, or are planning a new metal roof installation across Idaho's Western Treasure Valley, don't leave your chimney waterproofing to chance. Reach out to our expert team at Lassiter Roofing. With over 30 years of hands-on experience, individually quoted transparent pricing, and our 5-year workmanship warranty, we'll make sure your roof stays completely dry in every season!


